In this post I am going to explain how I make my status in Microsoft Teams running on my work laptop available in Home Assistant.
I have been working from home for more than six months now and have my work area in a fairly good and functional shape now – large desk, comfy chair, second monitor, good lighting, etc. However, there is one thing that has been a little bit out of my control: My desk is in a large open space in our house and it is close to the kitchen. And every now and then I find myself in the middle of a conference call while the family is turning on the kettle or cleaning the dishes in the background. If only there was a way to make it more obvious that I am in the middle of a call…
We are heavily using Microsoft Teams in our organisation, so my solution focuses on the presence concept of Teams. And if you have been reading my blog for some time now, you would be aware that I am a long time user of Home Assistant, so of course I want to represent my presence in there. This will give me all the flexibility to not only remote control a status light, but maybe other things, too, like for example turn off the radio when a meeting starts.
One thing that really caught my eye and kicked off this whole investigation was a recent post on the Home Assistant subreddit.
So now that we now what the vision for this integration is, let’s see how we can get there.
Access presence status from Teams
The first thing I tried was Microsoft’s Graph API. To play around with the various API calls you can try the Graph Explorer. The key API call for this integration is probably https://graph.microsoft.com/beta/me/presence which returns the availability and activity status.
The biggest challenge here is security. Of course security is important, especially with personal information such as whether you are working or not. However, multi-factor authentication and tokens make it hard to use this API on the server-side.
Luckily someone in the HA community forum pointed me to an app called PresenceLight. This app takes care of the authentication and authorisation process with the Graph API and actually provides a bit of a shortcut if you are not using Home Assistant – it can directly control Philips Hue, Yeelight or LIFX lights and change the colour based on your status. However it also contains a custom API option where you can define a URL to POST to – the perfect integration point for Home Assistant’s webhooks.
Installing PresenceLight
I installed PresenceLight from the Microsoft Store on my Windows 10 work laptop (Update: If you are not using a Windows machine, you can now also run PresenceLight as a Docker container). Administrator permissions for the installation were not required in my case – your experience may be different depending on the security constraints implemented by your organisation.
Authorisation Process
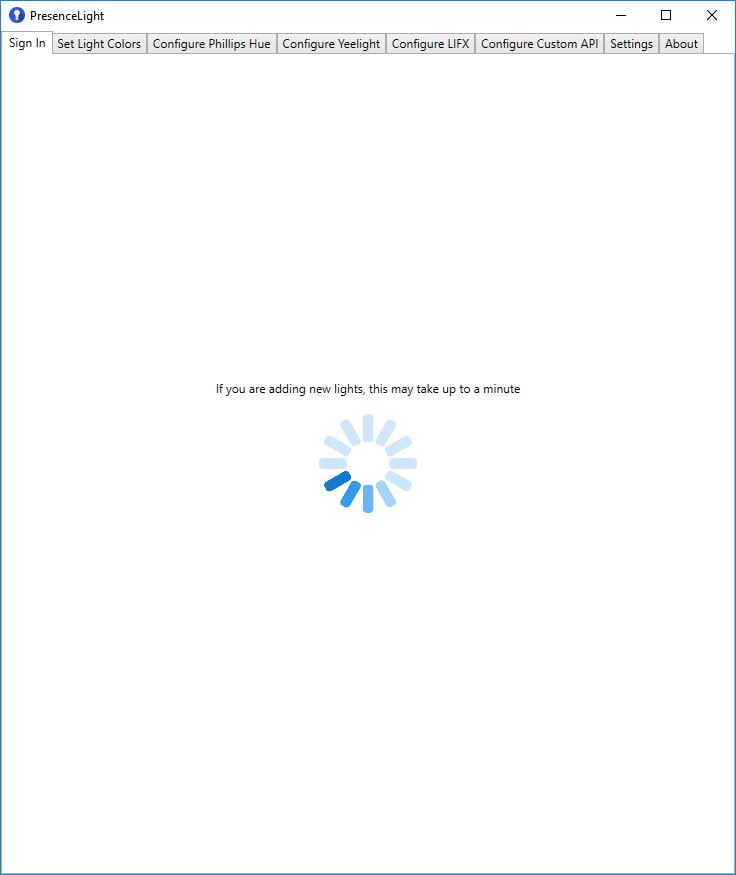
As part of the initial startup of the app you are being guided through the authorisation process that will allow PresenceLight to access your Teams status. The experience may be slightly different depending on whether or not your organisation has Multi-factor authentication (MFA) enabled, and whether or not you are already logged on to Office 365. After the successful authentication, the app shows the current Teams status on the first tab.
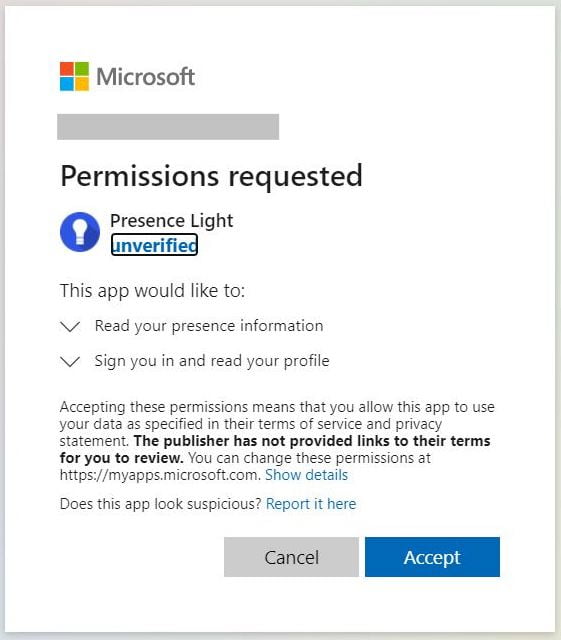
Note: If instead at this step you get a message “Need admin approval”, then you will need to ask your friendly IT department to help you with the installation and authorisation.
Autostart PresenceLight
Because Teams has become such an essential part of my workday it is automatically starting up when I start Windows. Hence it makes sense to also start PresenceLight automatically.
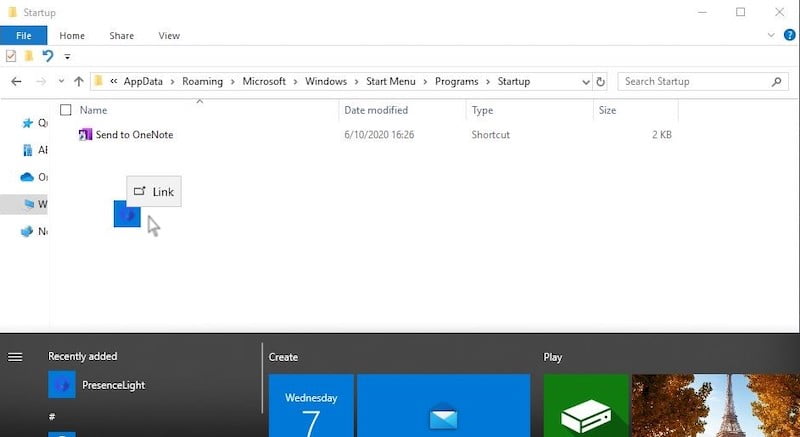
In Windows 10 you can for example do that by opening Windows Explorer and go to %APPDATA%\Microsoft\Windows\Start Menu\Programs\Startup. Now you can drag and drop the PresenceLight icon from the start menu into that folder and Windows automatically creates a link.
Shortcut if you are not using Home Assistant
If you are not using Home Assistant and either have a Philips Hue, Yeelight or LIFX lamp in your local network then have a look at the other tabs in the app. You can connect a lamp and change the colour depending on your status in Teams. I haven’t actually tried these options myself, because all my smart lights are integrated into Home Assistant and my work laptop is in a separate VLAN that has little access to the rest of my network.
If however you want to use the full power of Home Assistant then please continue reading.
Home Assistant Configuration
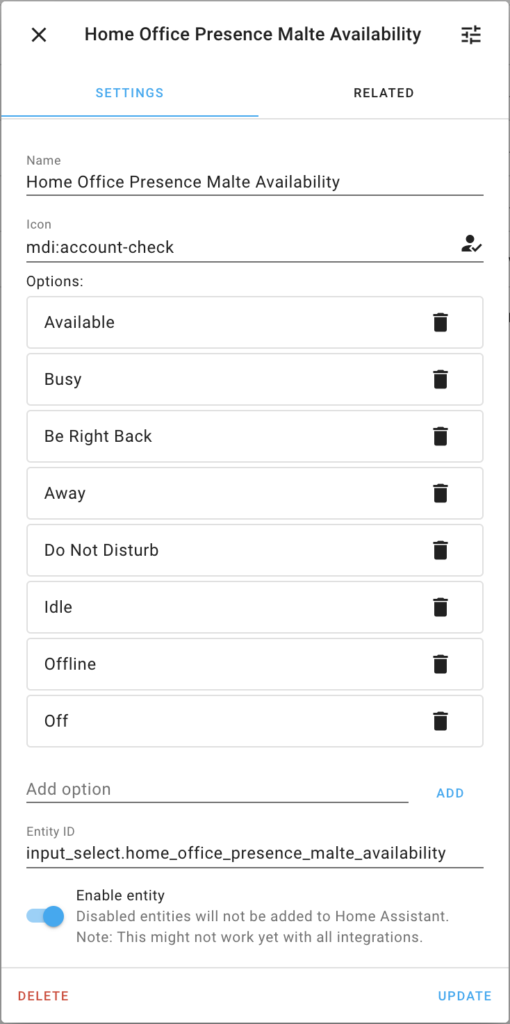
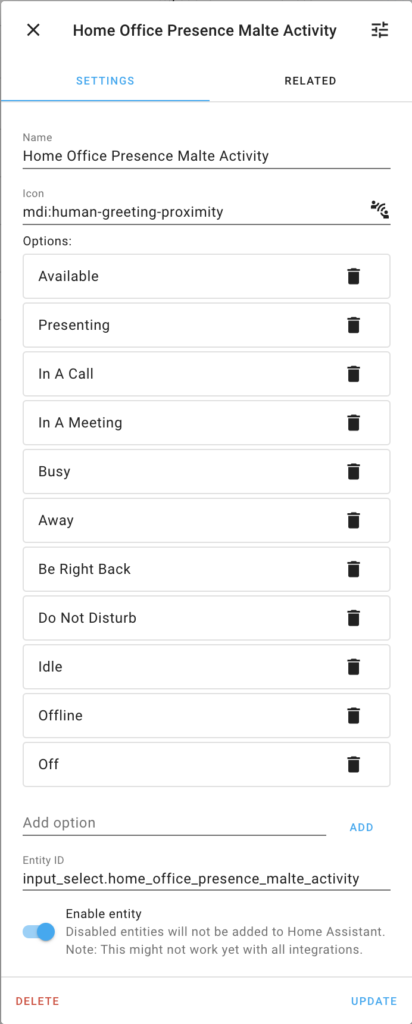
There are a couple of things to know and prepare for this integration. I decided to create 2 input selects – one for availability and one for activity. Each input select simply stores the actual value provided by the PresenceLight app. I decided to store a more human-readable form of the status instead of the original values used in the Graph API without spaces.
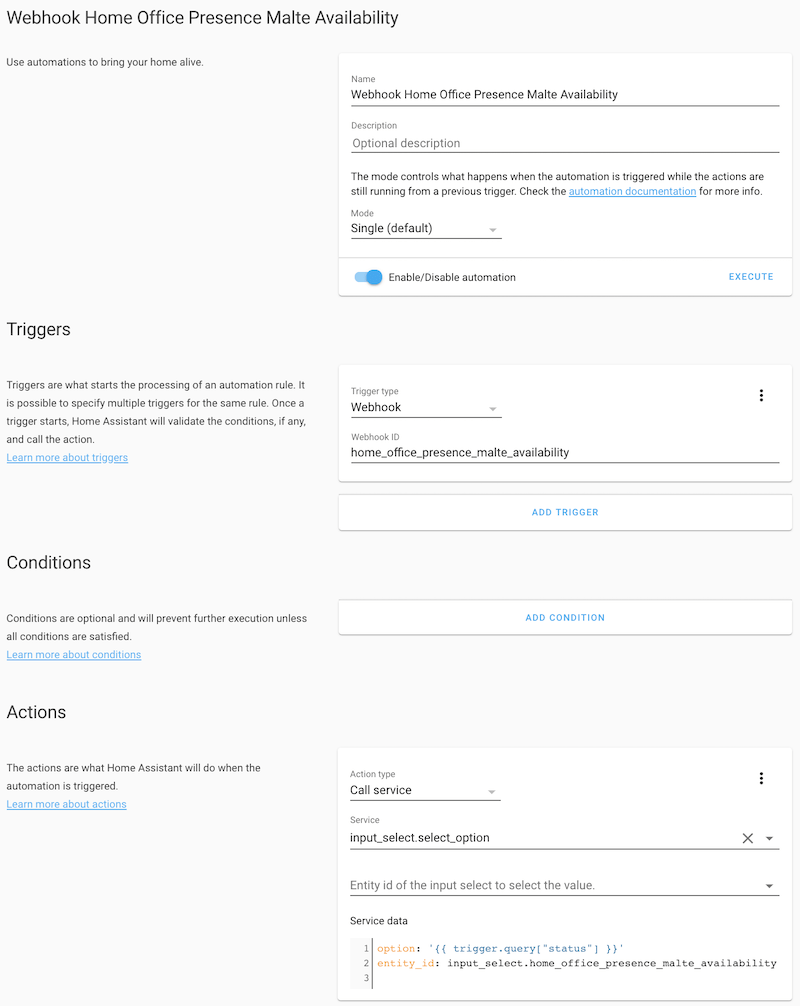
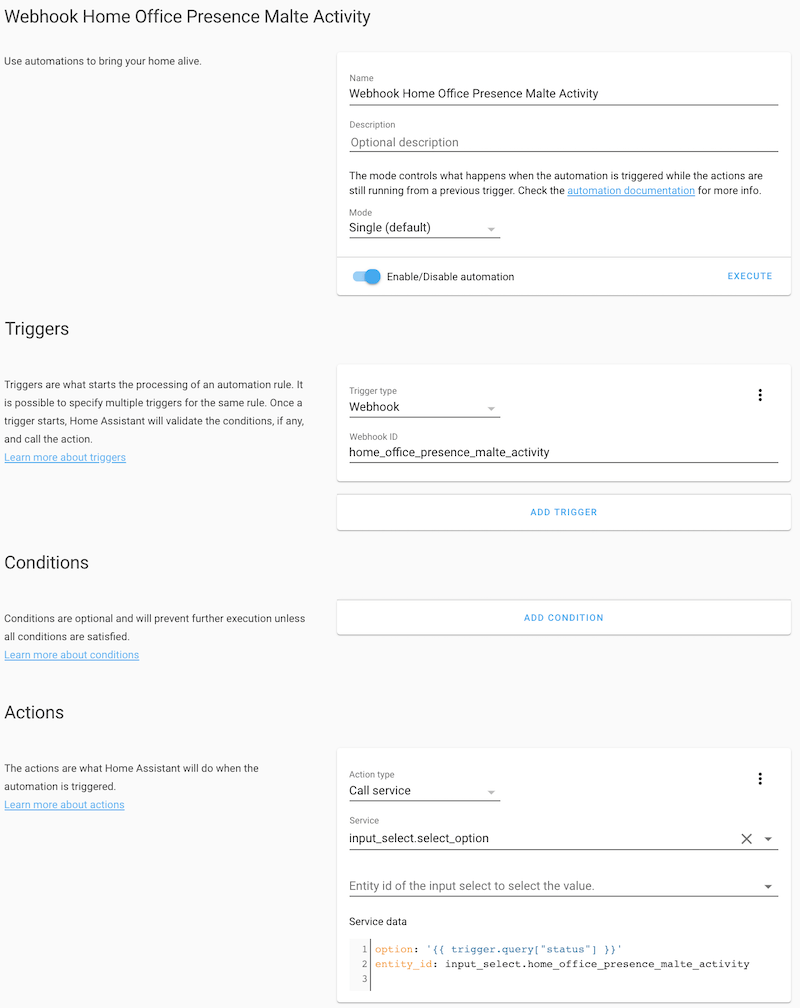
Next we need two automations that each use a webhook trigger. The webhook ID does not need to be defined separately and is just extracted from the URL that we will configure in PresenceLight. The action in each automation extracts a query parameter status and sets the value on the corresponding input select entity.
Instead of YAML configuration, this time I am only using a UI based configuration hence the screenshots below. To create an input select entity, go to Configuration -> Helpers -> Add Helper -> Dropdown.
Availability Input Select
Availability Webhook Automation
Activity Input Select
Activity Webhook Automation
Network Access Considerations
Let’s quickly talk about the network setup and access to Home Assistant:
- If Home Assistant and your computer running Teams are in the same local network then the setup should be fairly easy.
- However, if you are frequently using a VPN to dial into the corporate network, all traffic is routed through the VPN and local access to Home Assistant is not available anymore.
- If your Home Assistant instance is already accessible from outside your local network then make sure you can access its URL from inside your local network as well as through the corporate VPN.
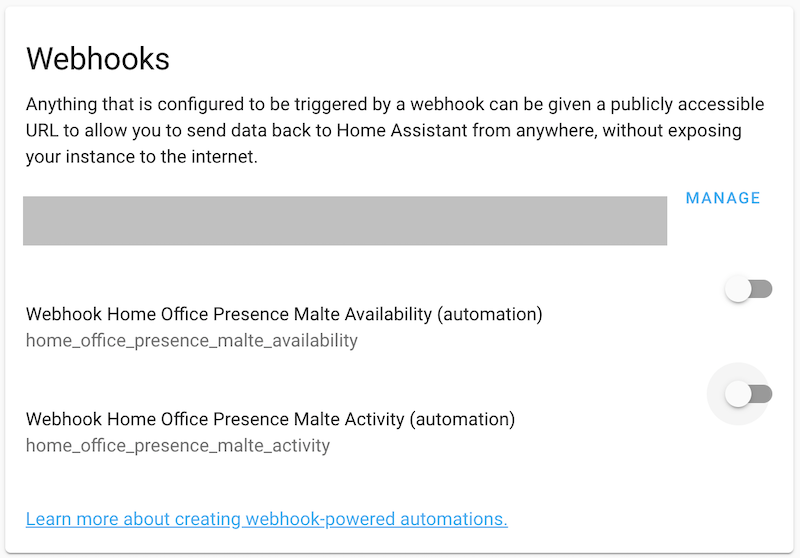
- An alternative is to use Nabu Casa’s webhook capability. After creating the automations above, go to Configuration -> Home Assistant Cloud and scroll down to the Webhooks section as shown below, find the new webhooks, activate them and use the URL displayed as your base URL in the PresenceLight configuration.
PresenceLight Configuration
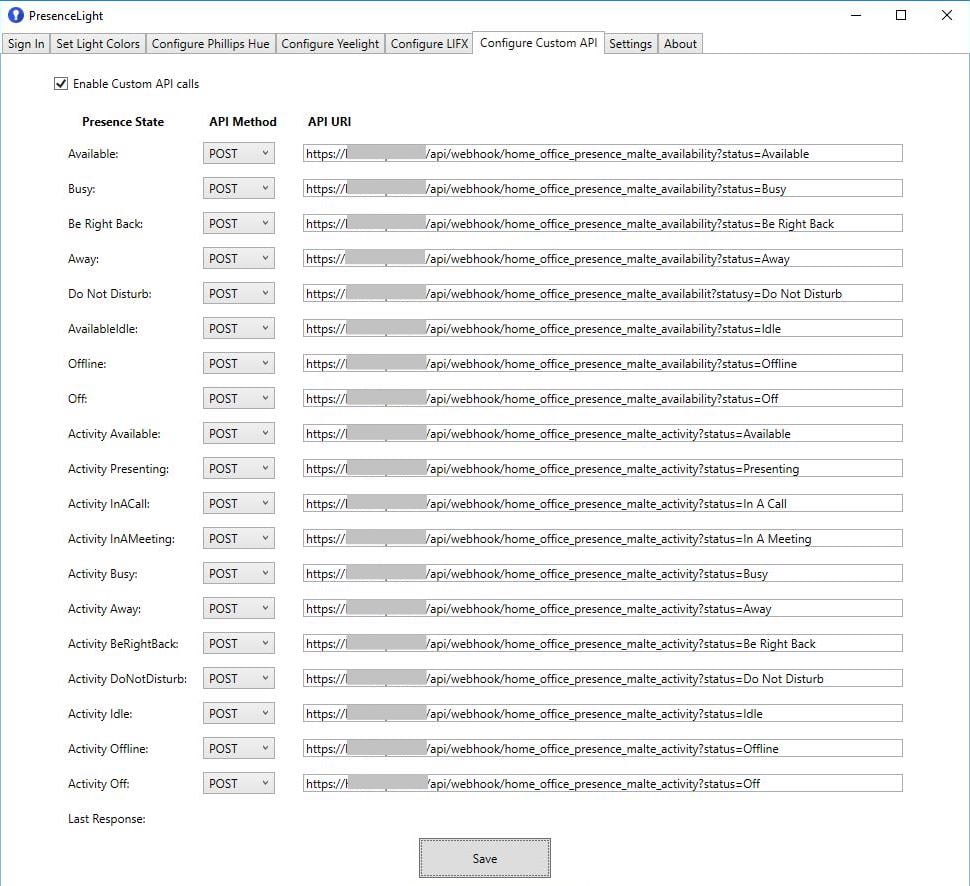
On the Configure Custom API tab in PresenceLight you have to tick the checkbox at the top and then fill in all the details.
- The API Method must be set to
POSTbecause that is the only method that the Home Assistant webhooks support. - The base URL of course depends on how you have set up your Home Assistant and how it is accessible from the computer running PresenceLight.
- The path is
/api/webhook/[webhook ID]where the webhook ID must correspond with the one configured in the automation triggers above. - If you decided to use Nabu Casa’s webhook integration the whole public URL including path is provided on the Home Assistant Cloud page. If you have already activated the webhook you can click on “Manage” to copy the public URL.
- Finally I added a URL parameter
statusthat carries the value, and which of course must correspond with the input select options.
The format for the first URL parameter is?status=[value]appended to the URL without a space. This works with both the direct approach where your Home Assistant instance is publicly accessible as well as with the Nabu Casa webhook integration.
Originally I thought about using just a single webhook ID, but that approach revealed a couple of challenges. While only a single automation would have been required, I had to use different URL parameters to distinguish availability and activity and thus the action would have become a bit more complicated to distinguish the two. Also, PresenceLight typically sends the two API calls very quickly in a row, so the automation mode would need to change to Queued or Parallel to correctly process both of them.
Now each time the presence status changes in Teams – whether manually or automatically – PresenceLight should call the corresponding webhook and update the status in Home Assistant. In my tests this typically happens in less than 5 seconds.
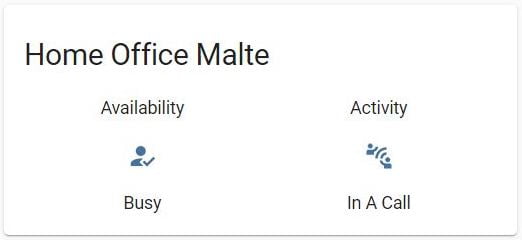
Home Assistant Panel
The following glance panel shows the current state of the two input select entities.
And now that the status information is available in Home Assistant you can start creating automations based on state changes.
Outlook
In the next part of this series I am going to show a simple configuration of a light based on the Teams status. And in the meantime I am going to think about how my final status light is going to look like and what components I will need for that.
Another area of research could be finding out the status of the microphone – muted or unmuted. This information is something that Teams itself via the Graph API does not expose, so I will need to look for something else.
Compatibility
At the time of writing this post, I used:
- Home Assistant 0.115.6 with Python 3.7.5 (please note that there appears to be an issue in 0.116.0 with the Nabu Casa webhook integration)
- Microsoft Teams 1.3.00.13565 on Windows 10
- PresenceLight 3.0.43.0
Update 17/03/2021
My PresenceLight was just updated to version 4.0.1.0 then 4.0.26.0, and I noticed that all the webhooks were gone from its configuration. Adding the webhooks back in did not work and they were not saved into the configuration file. This issue was reported and can be solved by manually deleting the configuration file and letting the application recreate it at startup.
Just in case you are wondering how I found the configuration file: In the PresenceLight application I went to tab Logs -> Log Files -> Click on a log file name and Windows Explorer opens up -> Go 3 folders up and find file settings.json.
Also, over the last couple of weeks I noticed that PresenceLights occasionally appears to stop reporting back to Home Assistant. I tracked this down to me frequently going on and off the corporate VPN. The only solution I have found was to sign out and sign back in on the PresenceLight application. This issue may be related to the split tunnel setup of the VPN, but that is currently out of my control.
Update 07/03/2023
In the meantime I moved from Windows 10 to macOS and can no longer run PresenceLight on my work laptop. The good news is that in the meantime the application is also available as a Docker container. I recently migrated my PresenceLight installation to Docker and explain the prerequisites and steps in a new post.
Leave a Reply to malte Cancel reply