In the following article I will provide a high-level overview of my network design, some details on the physical network devices I picked, and a few more implementation details.
Over the years my network has grown significantly and I typically had some flavour of integrated WiFi router until that broke or until the manufacturer was not supporting it anymore.
And over the last couple of years my requirements have changed: More family members own more devices that need Internet access. We moved into a larger house that allowed me to install structured cabling and which required broader WiFi coverage for more devices especially in the IoT space. I have deployed home-made IoT devices all over the house, in the garage, on the roof and even behind the pool.
Principles
Before I explain the logical and physical setup of the network, let’s have a quick look at what is driving the design decisions:
- Keep it simple: This is primarily a home network setup. The whole system should work with minimal ongoing maintenance effort. Avoid home-made hardware solutions for the core network components.
- Keep it affordable: Try to find a good middle ground between not going for the cheapest stuff and not spending thousands of dollars on professional gear. Spending a bit more on proven, reliable and supported hardware is OK.
- Keep it flexible: Avoid all-in-one devices to be able to upgrade key components when technologies or requirements change. Look for vendors that provide firmware/software updates and keep up to date with current technologies.
- Keep it reliable: The network should not fail too often, but if it does (e.g. power outage, Internet outage) it should recover automatically. I occasionally work from home and need a reasonably reliable Internet connection to be able to do that.
- Keep it secure: Keep devices, data and services on the network safe from internal and external threats. Reduce the attack surface.
Logical setup
Broadband Internet Access
I currently have a single broadband Internet connection. This has long been cable broadband, and I have just been connected to the NBN where this is called HFC (hybrid fibre coaxial).
Over the last 2 years my previous ISP (Optus) had seemingly neglected their cable network, and we had several outages per year, always unannounced and unexpected and usually took hours to restore.
I briefly investigated having a backup Internet access solution through wireless broadband: This would require for example a 4G device such as Netgear’s LB2120 and a data SIM card/plan; the router would then need to be configured to monitor the primary Internet connection, and automatically fail over to the alternative connection if the primary connection is down for more than 3-5 minutes. The investment into the wireless modem and a data plan is hard to justify, and I will observe the performance of the new NBN based broadband connection before I revisit this topic. In principle though the router I selected does support such a setup.
VLAN Design
I decided to segregate my home network into several VLANs.
| VLAN | Purpose |
| Management | This VLAN is for physical network devices such as the internal router interfaces, network switch, access points and my network controller. |
| Private | This contains all my own devices such as laptops, tablets, smart phones, fileserver, Home Assistant server, printer, TV and AV receiver. |
| Things | For all those IoT devices with potentially weaker security standards and as such require stricter access control, such as Philips Hue bridge, Amazon Echo, solar inverter gateway, homemade ESP devices, and more. |
| Video | For IP-based video surveillance cameras. The main reason for separating this from the Things VLAN is that the cameras are typically mounted outside of the house, and anyone who could get hold of the Ethernet cable of a camera should not be able to get any further into my network. |
| Guest | For devices that guests bring in. From here you can only get to the Internet but not to any of the other VLANs. |
WiFi
My WiFi access points support multiple SSIDs, and each SSID can be associated with a particular VLAN. I configured three different SSIDs – private, things and guest. The actual SSIDs are different to make sure they are unique in my neighbourhood.
At this point in time I only have Ethernet connected video surveillance cameras, and do not require a dedicated SSID for this network. The other benefit of having Ethernet connected video cameras is that they support PoE, i.e. I only need to run a single cable for data and power.
Physical setup
Please note: All devices described below come from the same manufacturer. I bought all devices myself and have used them in my home for 12+ months (except for the CloudKey which I only added about 4 months ago).
Router
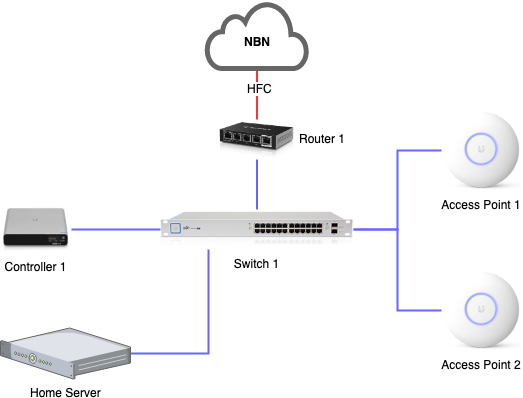
I decided to go with an EdgeRouter X which comes with 5 Ethernet ports. The first port is my WAN port – connected to a cable modem -, and the 4 remaining ports are aggregated into a virtual switch. Each VLAN added to that switch is represented as a separate network interface with its own IP address.
Before I bought a PoE switch I temporarily had 1 WiFi access point directly connected to the router – one of its 5 ports supports PoE.
The router comes with a web-based user interface for the essential stuff, but also allows for command line access via SSH which then provides access to the full configuration.
I configured a DHCP server for each VLAN that hands out IP addresses. Also, the built-in DNS server listens on each network interface and forwards any DNS queries to the ISP’s DNS servers. This allows me to additionally define some internal hostnames (mainly my home server) that are resolved locally on the router.
I make extensive use of the built-in firewall to control access from and to the Internet, as well as between my VLANs. More on this below.
Switch
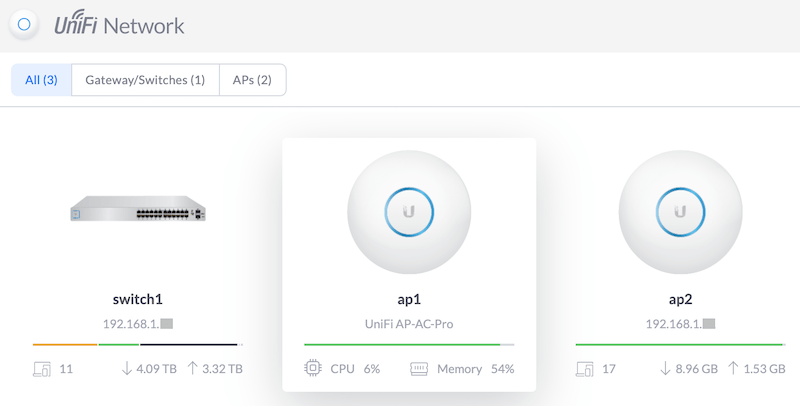
My switch – a UniFi US-24-250W – is a 24-port managed PoE+ Gigabit switch. The first port of the switch is configured as a trunk and connected to one of the LAN ports of the router.
Wherever possible I try to connect as many devices via Ethernet instead of Wifi. The main reason is a steadily growing number of Wifi-only devices, and more Ethernet connected devices lower the risk of Wifi congestion.
Access Points
I deployed two UniFi UAP-AC-PRO access points to provide good coverage in all areas of my house, garage and garden. The access points are connected to the switch via Ethernet and powered via PoE. The solution provides seamless roaming between the access points which is quite nice when walking around with mobile devices.
Having two access points also works nicely during firmware upgrades: While upgrading one access point, all wireless devices connect to the second access point, and once the first access point is upgraded and up and running again, I’ll proceed with the upgrade of the second access point.
Network controller
The devices of the UniFi product line require a controller. I had the controller software alongside with the video recorder software installed on my home server for a while, but recently decided to outsource both to a dedicated device: The UniFi Cloud Key Gen2 Plus (UCK-G2-PLUS) combines the UniFi network controller software and video recorder software with a 1 TB hard-drive in a small PoE-powered device.
UniFi Controller is Ubiquiti’s attempt at a software-defined network (SDN). The idea is to use a central controller that provides access to all configuration options that the network devices support, and the devices are provisioned according to the configuration changes made.
On the video recording side all video streams from all cameras are recorded 24/7 and the UniFi Protect app then shows a timeline view indicating when motion was detected. The device manages local hard drive space and deletes old content automatically.
A little drawback of UniFi Protect is that the Cloud Key device does not support VLANs and only has a single network interface. Having UniFi Controller on the management VLAN is fine, but being forced to have UniFi Protect on the same VLAN means that the video cameras must be able to connect into the management VLAN. A clever firewall rules helps, but this setup is not ideal.
There are apps for both UniFi Controller and UniFi Protect, and these do not only work at home when connected to WiFi, but also remotely (if enabled) via the manufacturer’s cloud based forwarding service. You have to decide if you need this and want to trust the manufacturer, but I am occasionally using remote access and it is quite reliable and convenient. The UniFi Controller app is also quite useful if you just want to quickly activate a switch port or check the port status without carrying around a laptop.
What I did not know when I started buying Ubiquiti’s products was that the EdgeMax product line that the EdgeRouter X belongs to is separate from the UniFi product line that my access point, switch and surveillance cameras belong to. That means that the Cloud Key controller can’t manage the EdgeRouter X and also can’t show any information relating to Internet access. So far this is more of a small inconvenience and requires a bit of double-handling of configuration, such as VLANs.
Network Details
Public IP address and NAT
As usual, my ISP only gives me a single public IPv4 address, and I am using NAT on the router and multiple private subnets in my home network.
I decided to pay $5 extra per month to get a static IP address. This allows me to connect to devices on my home network via SSH/HTTPS or VPN. And it also makes the setup easier because I can configure a static DNS entry to reach home instead of using a dynamic DNS service to deal with changing public IP addresses.
IPv4 subnets
I have mapped one subnet per VLAN from the 192.168.x.x pool. For simplicity I use the VLAN ID as the third octet of a class C subnet.
I will focus on IPv4 for now. My journey with IPv6 has just started and will be the topic of another article.
Access Control
The router controls access between the VLANs and from any of the VLANs to the Internet (WAN interface). It distinguishes three destinations: In – from the network into the router’s interface, Out – from the router’s interface out to the network, Local – from the network to the router’s internal services. Someone provided a nice diagram on the Ubiquiti Community Forum explaining this in a bit more detail.
At the moment I have implemented the following access rules:
| Source | Destination | Description |
| WAN | In | Allow established connections |
| WAN | Local | Allow established connections |
| WAN | Local | VPN end-point (L2TP) Ports 500/udp, esp, 4500/udp, 1701/udp |
| Things VLAN | Local | Allow essential services: DNS (53/udp) and DHCP (67/udp) |
| Things VLAN | In | Allow established connections |
| Things VLAN | In | Amazon Echo Allow HTTP (80/tcp), HTTPS (443/tcp), NTP (123/udp) |
| Things VLAN | In | Philips Hue hub Allow HTTP (80/tcp), HTTPS (443/tcp), NTP (123/udp) |
| Things VLAN | In | Wemo switch Allow HTTP (80,3478,8080,8445/tcp), HTTPS (8443/tcp), NTP (123/udp) |
| Things VLAN | In | Envoy-S Allow HTTP (80/tcp and 80/udp) |
| Things VLAN | In | Luftdaten device Allow HTTPS (443/tcp), NTP (123/udp), and to Home Server (8086/tcp) |
| Video VLAN | Local | Allow essential services: DNS (53/udp) and DHCP (67/udp) |
| Video VLAN | In | Allow connections to video recorder in Management VLAN only |
| Guest VLAN | Local | Allow essential services: DNS (53/udp) and DHCP (67/udp) |
| Guest VLAN | In | Allow established connections; drop any connection to any local network |
Port Forwarding
I am forwarding the following two ports:
- HTTPS – Port 443 forwarded to my home server for remote access to Home Assistant and monitoring services.
- SSH – Port 22 forwarded to my home server for remote shell access to my network.
The router automatically creates firewall rules to allow traffic to these ports come through. On my home server I run a separate firewall, and I installed fail2ban which automatically bans IP addresses for a period of time if malicious behaviour is detected.
VPN
The EdgeRouter X has a built-in VPN and I configured it as an L2TP server. Laptop and smartphone support this out-of-the-box, and once connected the devices are joined to my private VLAN – like they would if I was at home.
Captive DNS
Despite the fact that my router supports DNS forwarding to my ISP’s DNS servers, and all my local devices are supposed to use my local DNS server, there are some devices that have an alternative DNS server hard-coded. An example of this behaviour is the Netflix app on my Android TV which uses Google’s DNS server directly.
A NAT destination rule has been configured that redirects all requests to port 53 to my local DNS server. I had to duplicate this rule for each VLAN.
Outlook
In the next part of this series I will provide a brief overview of my home server.
Leave a Reply