It has been two years since my initial post showcasing my home network setup and I have made some changes – upgrades and expansions – that I am going to explain here.
Overview
New Router
My old EdgeRouter X had slowly been getting to its limits with the number of devices on my network and just the overall complexity of its configuration. It was time for an upgrade and I decided to go with the UniFi Dream Machine Pro (UDM-Pro). This not only replaced my Internet router but also the network controller and video recorder (previously: UniFi Cloud Key Gen2 Plus), after I added a 4TB hard-drive to the UDM Pro.
UDM Pro – Still work in progress
My UDM Pro is now in use for about 9 months and apart from the core Internet routing functionality I am using it for two primary built-in capabilities:
- Network – This the network controller software which lets me configure all my UniFi devices and all aspects of the network.
- Protect – This is the network video recorder software which receives feeds from all my UniFi cameras.
I do not use Access or Talk which are more aimed for small businesses and provide door access management and a VoIP solution respectively.
My experience with the UDM Pro firmware upgrades has been a bit bumpy. The developers at Ubiquiti are somewhere in the middle of a huge overhaul of the user interfaces and there are frequently features that are not quite ready yet in the new UI and you have to switch back to their “classic” UI. Also, the developers and UI designers are clearly still figuring out where to put things and where and how to show them in the UI, so functionalities and information is moving around from time to time.
There is also a long list of outstanding feature requests, so make sure you read or watch several in-depth reviews of this device or search the Ubiquiti forum for known issues or functionalities crucial to your setup.
Connections
In terms of connectivity the UDM Pro comes with a built-in 8-port Ethernet switch. Because the switch ports do not come with PoE (watch out for the brand new UDM Pro SE!) I could not connect my PoE cameras, and currently use it for the uplink to my second switch as well as some devices that simply need direct Internet access without major traffic into my home network (like for example my work laptop).
For the connection to my 24-port switch I decided to use a Direct Attach Copper (DAC) cable. This is a bit more expensive than a good CAT6a patch cable and due to the fact that my switch only comes with an SFP port (not SFP+) I can only get a maximum of 1Gbit/s over this link. But it works.
Custom add-ons
One of the interesting aspects of the UDM Pro is that it is essentially a rack mounted Linux server with quite a bit of processing power. You can access the command line and run additional software in containers, and luckily someone collected plenty recipies for running useful add-ons. The first thing you would have to do is install a on-boot-script that enables customisations, and after that you essentially just deploy containers.
Of course you are leaving the safety of full vendor support here, but so far I haven’t had any real issues with my custom containers while upgrading to new UDM Pro firmware versions. The only issue I found is that after the first boot after a firmware upgrade you have to manually restart the custom add-ons once like this:
# unifi-os shell
# systemctl start udm-boot
Local DNS
Unfortunately the UDM Pro does not come with the capability to add local DNS entries – like my EdgeRouter X did. I decided to try Pi-hole and wasn’t disappointed. The Pi-hole DNS server sits on its own subnet and IP address and essentially I just configure this IP address as the main DNS server in my local DHCP scopes, and then forward all DNS queries back to the UDM Pro’s built-in DNS forwarder which itself forwards all queries to my ISP.
In addition, Pi-hole allows me to create local A and CNAME records which is perfect when running lots of services in my network.
NTP
I have recently started to replace several of my unreliable and expensive Z-Wave switches with Shelly switches. What I noticed however is that the Shelly devices by default try to connect to a Google NTP server. The NTP server address is configurable and because I did not already have one in my network I decided to install Chrony.
Tasmota devices also want to synchronise their time with an NTP server and I am sure there are plenty more such devices that could benefit from a local NTP server.
Multicast Relay
Because of the way I have set up my network with multiple VLANs and strictly separating IoT devices from anything else, the drawback is that any device that wants to use multicast to for example talk to an app on your mobile phone or Home Assistant will probably not quite work as expected. So I decided to install a multicast relay which I configured to join my IoT network with my server and private networks.
Of course, if you have set up a firewall around your IoT network (which you absolutely should) then you will have to manually create firewall rules for any multicast traffic you actually want to allow.
Monitoring
All UniFi devices that I own support SNMP which is great for monitoring, except for the UDM Pro which – at the time of writing this – does not have SNMP built in.
The next best option to monitor the UDM Pro that I have found is UnPoller which basically collects everything it can from the UDM Pro and stores the information in an InfluxDB which you can then hook up with your preferred monitoring or home automation system. I decided to run UnPoller and InfluxDB on my home server, but more on that in a different post.
Other network changes
With the replacement of the router I made a few more changes, including:
- I added a dedicated “Server” VLAN to my set of existing ones. The main reason for this to change the attack surface of my server-side systems. Originally I used to install services directly onto my home server and then protected this server with a UFW firewall. With the continuous adoption of Docker this approach did not really work anymore (Docker automatically punches a hole into the firewall when you map a container port to the host). With the setup of a separate VLAN I can now control access through the UDM Pro’s firewall.
- The next thing maybe looks more aesthetic: I switched from the
192.168.x.xaddress range to10.10.x.x. One of the reasons was to get slightly shorter and easier to type IP addresses, and it also made the transition a little easier having the ability to have old and new address ranges on the network at the same time.
Expansion into Garage
Over time I have added more and more devices into my garage and workshop, for example IoT wall fans, lights and light switches, sensors, as well as a PC and a 3D printer with Raspberry Pi running Octoprint. WiFi connectivity from the access points in the house was mediocre at best and it was time to make some changes.
Initially I added an access point into the garage and tried UniFi’s mesh functionality. This worked out-of-the-box with minimal configuration effort, but unfortunately the wireless link was sketchy and low-bandwidth, thanks to some distance and two brick walls.
Connect via Powerline
Running new copper or fibre between my rack under the house into the garage would have been (and still is) my favourite option, but due to lots of concrete and pavers between house and garage a really difficult undertaking.
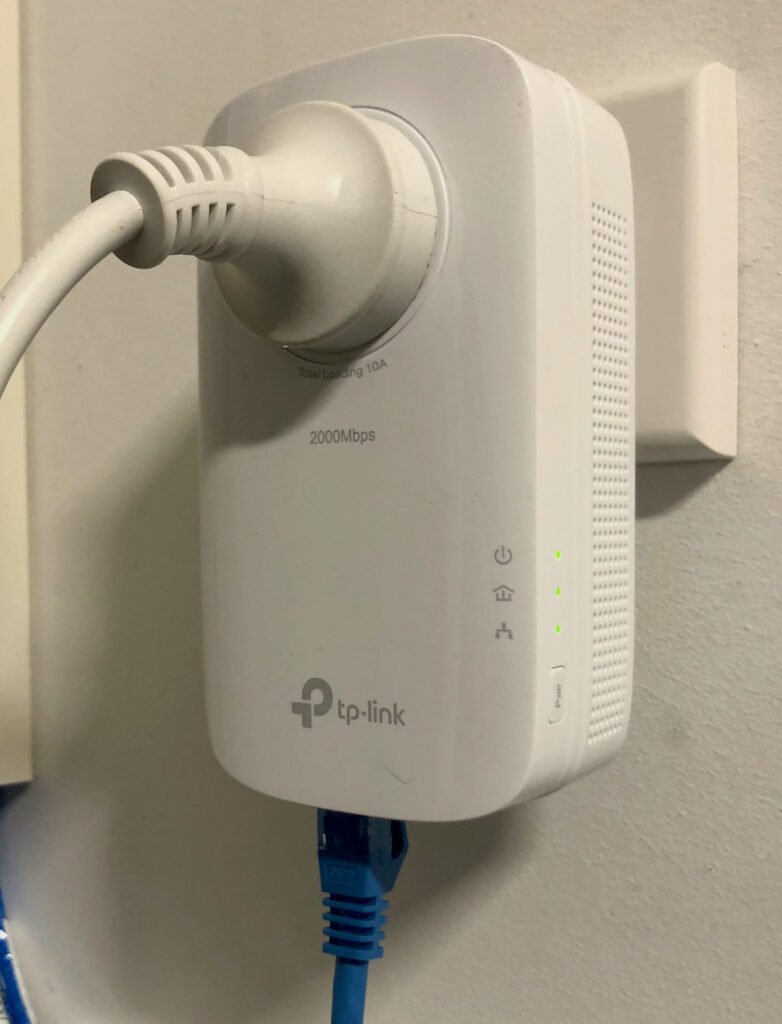
Instead I decided to give powerline a try: TP-Link AV2000 (TL-PA9020P KIT) is the product I installed and – at least in my case – it can indeed connect my router’s built-in switch and a new compact switch in the workshop with a 1 Gbit/s connection. Please note that you need to connect both plugs into outlets on the same power circuit. The setup itself was easy – just plug into the power outlet, patch the Ethernet connection through to the switch and follow the pairing procedure, and the link was up in about 5 minutes. Unfortunately the plug itself is just wide enough to block access to a neighbouring power outlet – but that is just the usual bad design I have seen with so many Australian devices.
Compact switch
The compact switch I bought for the workshop is a UniFi Switch Lite 8 PoE (USW-Lite-8-PoE). Only 4 of the 8 ports actually provide PoE, but that is enough to power my access point and the Raspberry Pi. One more port is of course required for the uplink, but that still leaves sufficient capacity for my setup.
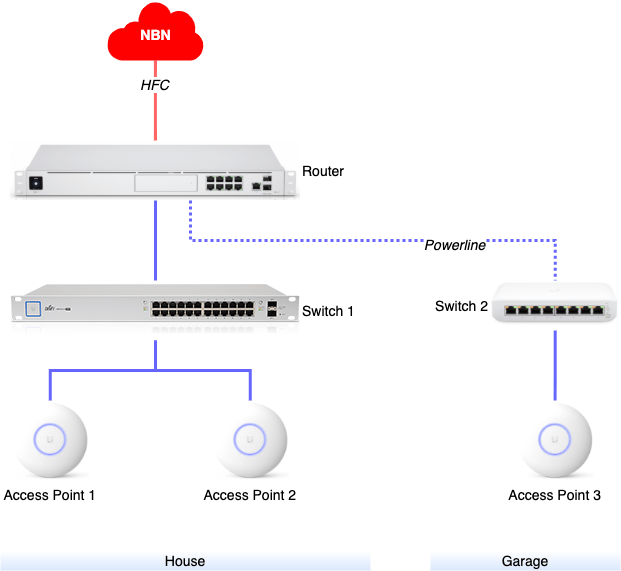
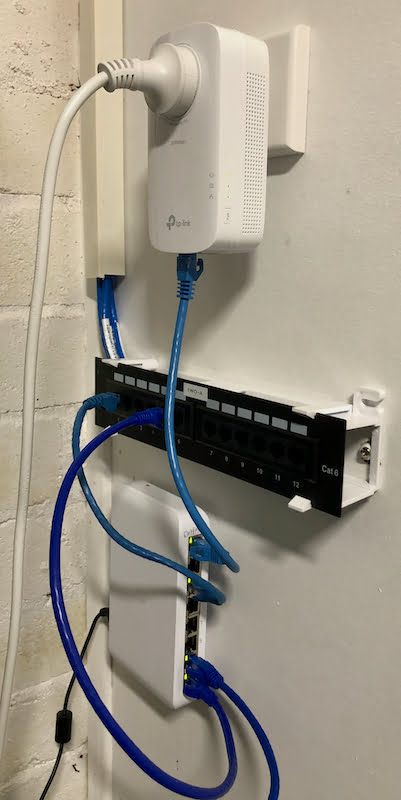
Overall setup
The compact switch comes with a simple wall mount bracket and as you can see in the following photo that is exactly what I have used. The powerline device sits in a dedicated power outlet and shown here is a small 10″ patch panel where cabling into garage and workshop are terminated close to the switch.
Outlook
In the next part of this series I am going to explain a bit more how I changed the server side of things by making more use of virtualisation and containerisation.
Leave a Reply