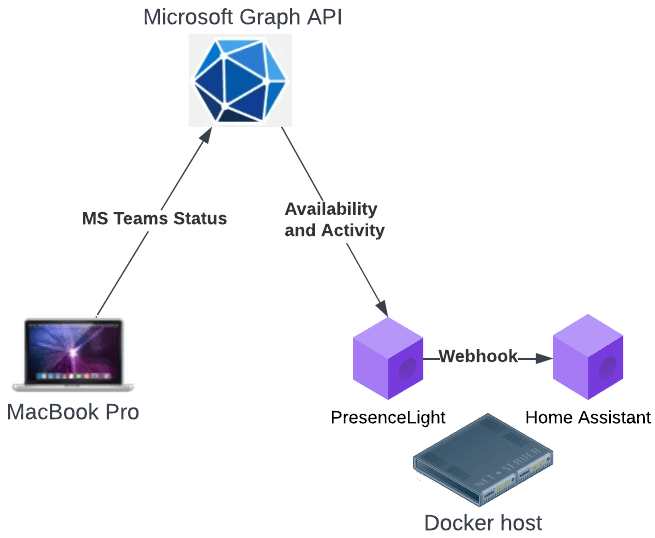
I recently refreshed my work laptop and in that process moved away from Windows 10 onto a MacBook Pro. I am still using Microsoft Teams every day but the application PresenceLight that I installed 2 1⁄2 years ago to share my availability with Home Assistant does not work on macOS. The good news is that there is now a Docker based version, and here I am describing how I set that all up.
Run PresenceLight as Docker container
There are various options to run PresenceLight as a Docker container. You could run it on the MacBook where Microsoft Teams is running, but this is not actually necessary, because PresenceLight is not directly communicating with Teams, but through Microsoft’s Graph API. And because I already have a Ubuntu Linux server in the house that runs plenty of other Docker containers, I decided to add PresenceLight there.
Preparation
Redirect URL to work with Microsoft Graph API
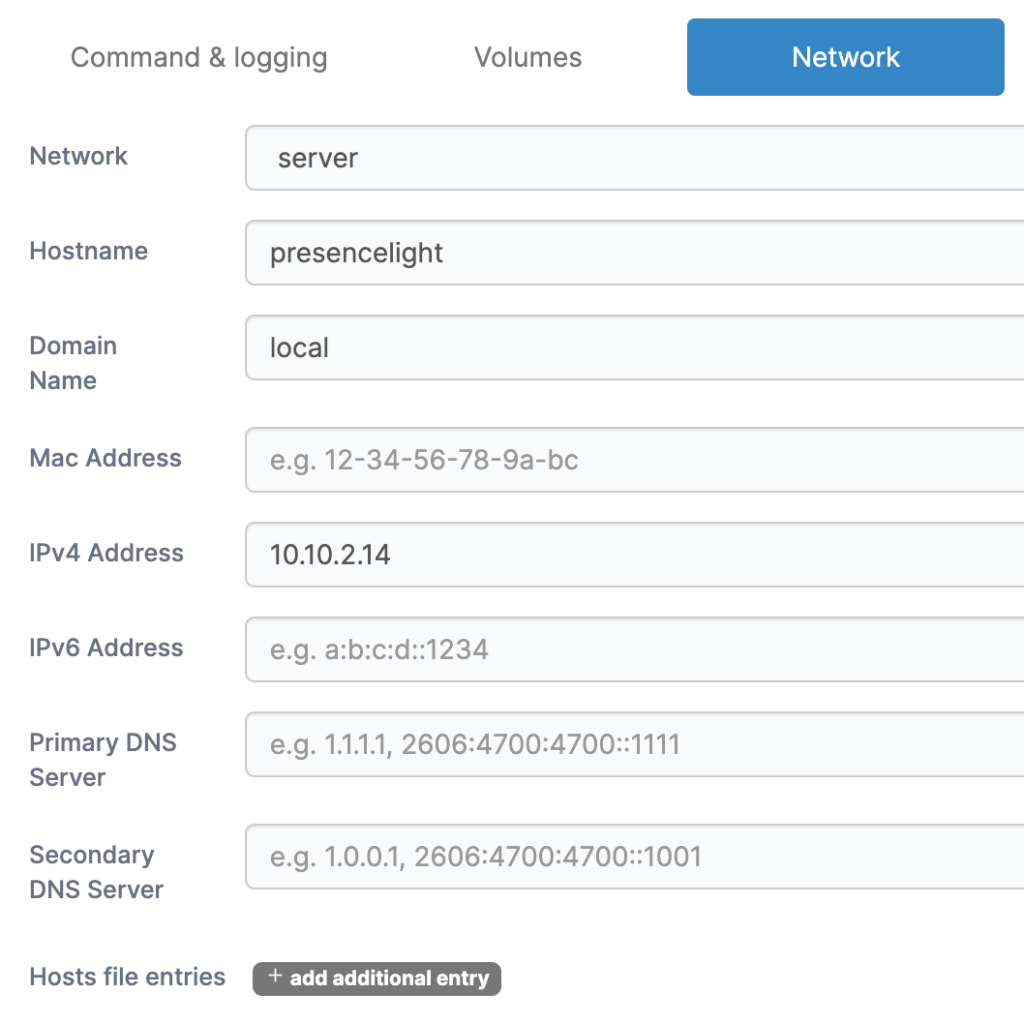
The way the authentication between the new container and Microsoft’s API works is that you are redirected from the PresenceLight web UI to Microsoft to get you through the authentication process and you are then later redirected back to PresenceLight. This requires a working redirect URL and these cannot be random but you have to select from preconfigured hostnames or IP addresses depending on your circumstances. Because I want to run the container on a separate host, I cannot use localhost or 127.0.0.1, and because I did not want to reconfigure my whole network just for this container the suggested IP address 192.168.68.27 is not an option for me either. That leaves me with hostname presencelight.local as the only option.
Please note that the way the author of PresenceLight has set up his own environment does only work for him because he has registered a redirect URL based on his personal domain for himself, which the rest of us can’t do. I would have loved to use the same approach and use my own domain, but that is unfortunately not possible.
Container network
I have configured several different networks in my Docker environment, and one of those networks allows a container to get an IP address of the host’s network and makes it directly accessible in my local network. Port mappings or a reverse proxy are not required in this scenario.

In this instance my network is 10.10.2.0/24 and I picked IP address 10.10.2.14 for this new container.
mDNS
To make the presencelight.local name work in your network the simplest way is to just add an entry to your machine’s hosts file, but I decided to go with a slightly more robust way and us Avahi which comes with an mDNS resolver for the local network.
Please note that a normal DNS server (for example Pi-Hole) does not work with .local addresses, hence an mDNS resolver is the best way in this instance.
I already had this installed on my Ubuntu host machine where I added a new entry to file /etc/avahi/hosts:
# This file is part of avahi.
# ...
10.10.2.14      presencelight.local
After saving this file a restart of the service is required:
$ sudo systemctl restart avahi-daemon.serviceFolder structure on the host
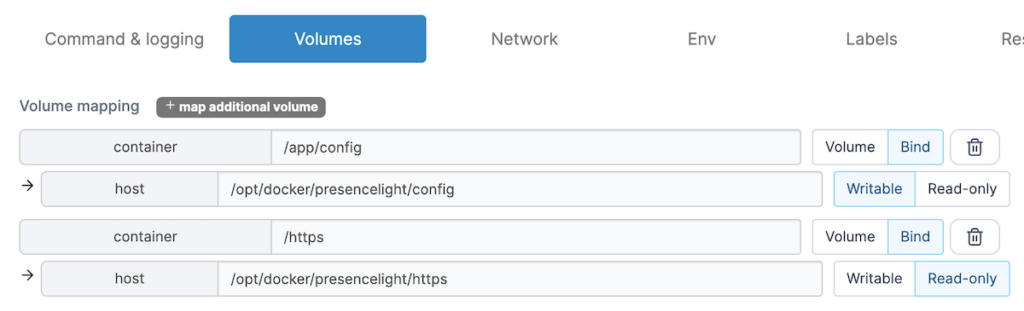
I store configuration files for Docker containers in a sub-folder under /opt/docker on the host machine, so for the PresenceLight container I created the following:
/opt/docker/presencelight/configfor general configuration mapped to/app/configin the container./httpsfor the SSL certificate mapped to/httpsin the container.
TLS/SSL Certificates
For the authentication process to work the PresenceLight web UI needs a valid TLS certificate. Here are the steps I followed on my host machine.
Generate key and certificate signing request: This certificate is required so that the PresenceLight web UI can be served via HTTPS.
$ cd
$ mkdir presencelight
$ cd presencelight
$ openssl req -new -newkey rsa:2048 -nodes -out presencelight_local.csr -keyout presencelight_local.key -subj "/C=/ST=/L=/O=/CN=presencelight.local"
Generating a RSA private key
.......+++++
................................................+++++
writing new private key to 'presencelight_local.key'
-----
req: No value provided for Subject Attribute C, skipped
req: No value provided for Subject Attribute ST, skipped
req: No value provided for Subject Attribute L, skipped
req: No value provided for Subject Attribute O, skipped
$ ls -l
total 8
-rw-rw-r--  1 malte malte    903 Jan 20 08:32 presencelight_local.csr
-rw-------  1 malte malte   1708 Jan 20 08:32 presencelight_local.key
Self-sign the certificate: This is required because public Certificate Authorities (like for example Letsencrypt) cannot issue certificates for local namespaces.
$ openssl x509 -signkey presencelight_local.key -in presencelight_local.csr -req -days 365 -out presencelight_local.crt
Signature ok
subject=CN = presencelight.local
Getting Private key
$ openssl pkcs12 -inkey presencelight_local.key -in presencelight_local.crt -export -out presencelight.pfx
Enter Export Password:
Verifying - Enter Export Password:
$ ls -l
total 16
-rw-rw-r--  1 malte malte 1017 Jan 20 08:34 presencelight_local.crt
-rw-rw-r--  1 malte malte  903 Jan 20 08:32 presencelight_local.csr
-rw-------  1 malte malte 1708 Jan 20 08:32 presencelight_local.key
-rw-------  1 malte malte 2309 Jan 20 08:35 presencelight.pfx
And finally you have to copy the signed certificate file to the container configuration.
$ sudo cp presencelight.pfx /opt/docker/presencelight/httpsDeploy container
I use Portainer to create and manage my containers – the following command is just there to demonstrate the parameters that you would need to define when creating a container directly from the command line.
$ docker run -d \
--name presencelight \
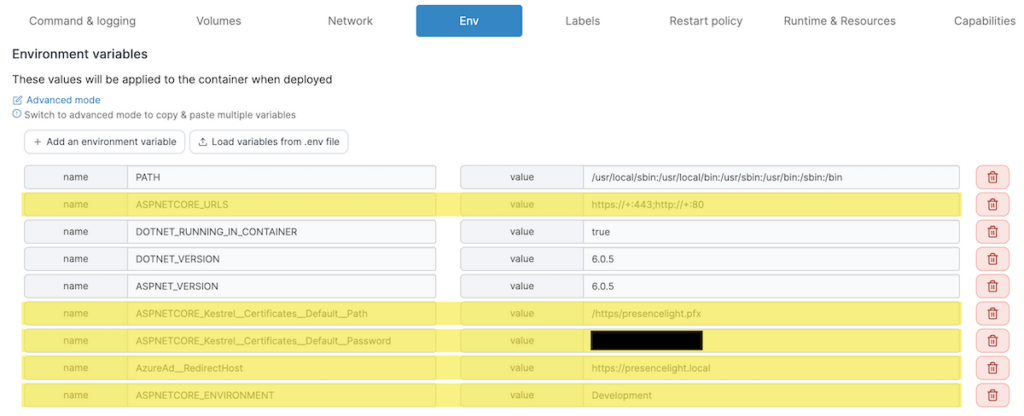
-e ASPNETCORE_URLS="https://+:443;http://+:80" \
-e ASPNETCORE_Kestrel__Certificates__Default__Password="presencelight" \
-e ASPNETCORE_Kestrel__Certificates__Default__Path=/https/presencelight.pfx \
-e AzureAd__RedirectHost="https://presencelight.local" \
-e ASPNETCORE_ENVIRONMENT="Development" \
-v /opt/docker/presencelight/config:/app/config \
-v /opt/docker/presencelight/https:/https:ro \
--hostname presencelight \
--network server \
--ip 10.10.2.14 \
--restart unless-stopped \
isaaclevin/presencelight:latestThe following screenshots illustrate how the configuration of the new PresenceLight container would look like in the Portainer web UI.

The value for ASPNETCORE_Kestrel__Certificates__Default__Password must of course correspond with the password you chose when self-signing the SSL certificate earlier.
Authentication via the UI
If you had previously run PresenceLight as a desktop application, then the initial authentication should be fairly simple because the PresenceLight service is already registered, and you probably only need to go through the usual authentication process to allow this Docker based instance access to your Teams status.

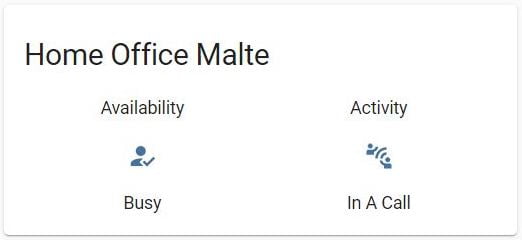
If everything goes well you should see your current Teams status on the main page in PresenceLight’s web UI.
Configuration in Home Assistant
Now let’s have a look at the configuration required in Home Assistant to make this all work. Again, if you had already been running the PresenceLight desktop application, then you don’t need to worry about this step because it is exactly the same as I have shown in my previous post.
Helpers
Go to Settings -> Devices & Services -> Helpers -> Create Helper -> Dropdown to create the following two helpers required to store the availability and activity values. Please note that the option values added to each dropdown must be the same that you will configure inside PresenceLight later on.
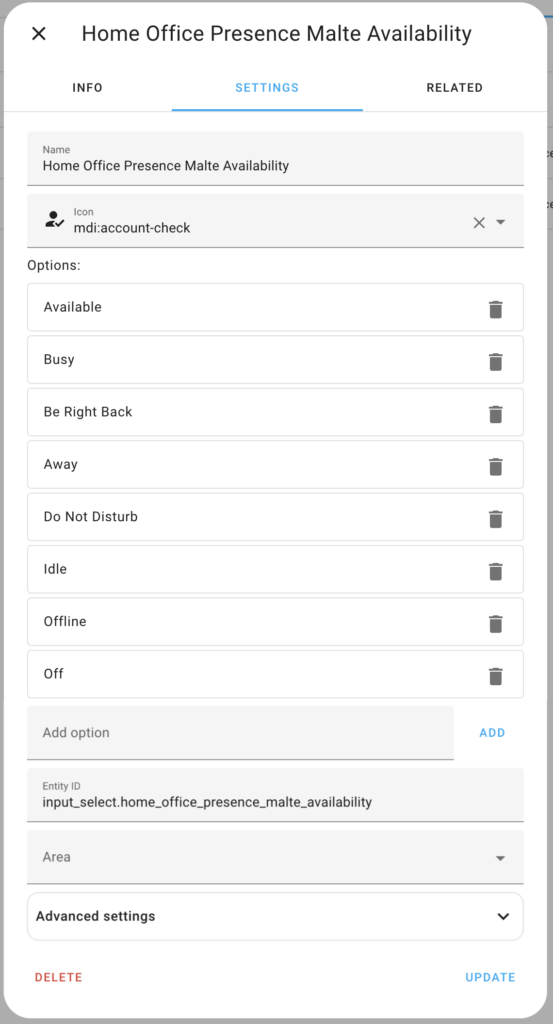
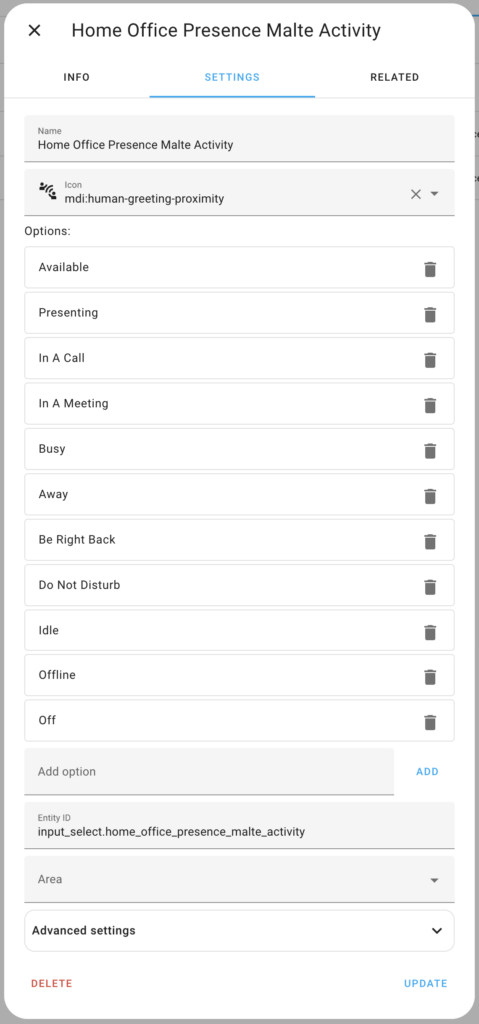
You can later use the value of these helpers to trigger automations and for example control lights or fans around your desk.
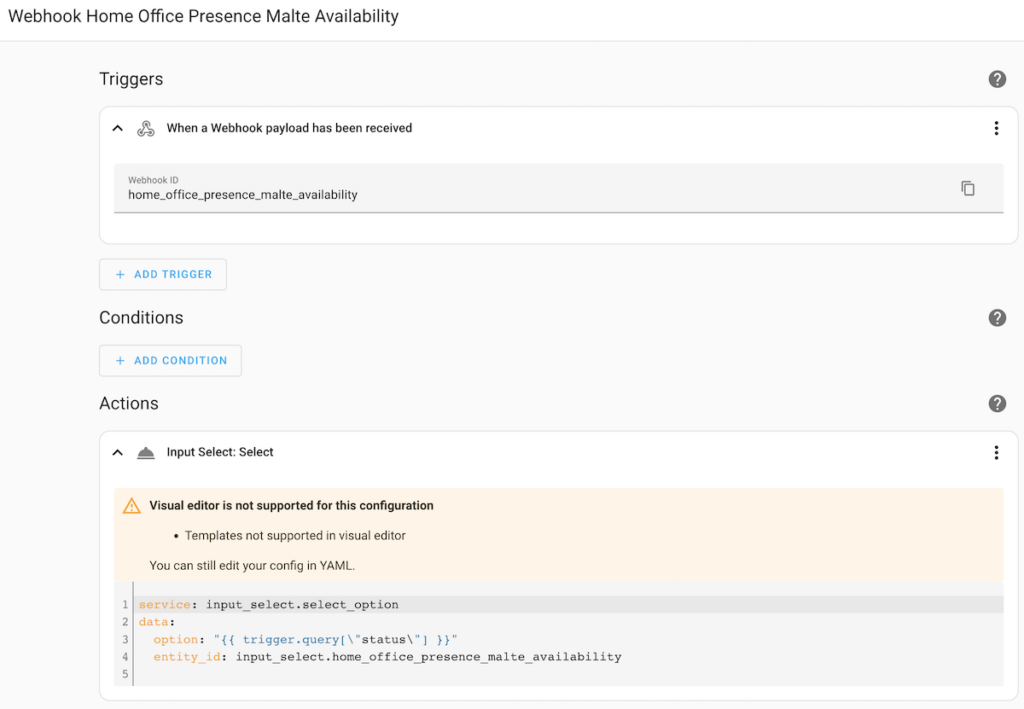
Automations
Go to Settings -> Automations & Scenes -> Create Automation to create the following two automations which will take care of updating the above helpers when their corresponding webhook is called.
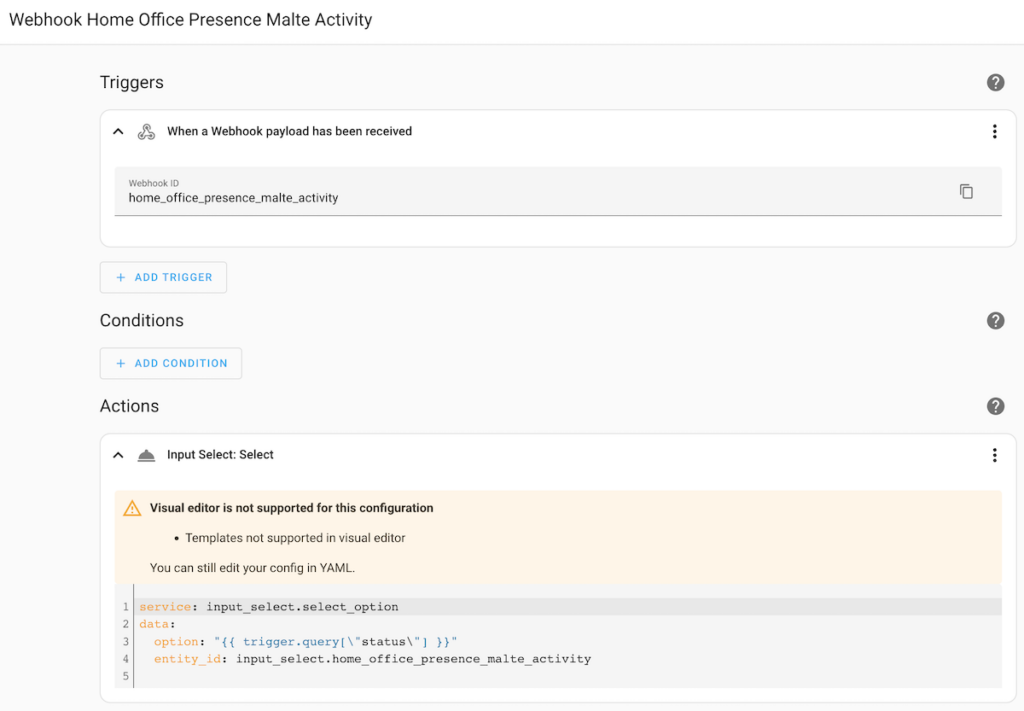
PresenceLight configuration
Configure webhooks into Home Assistant
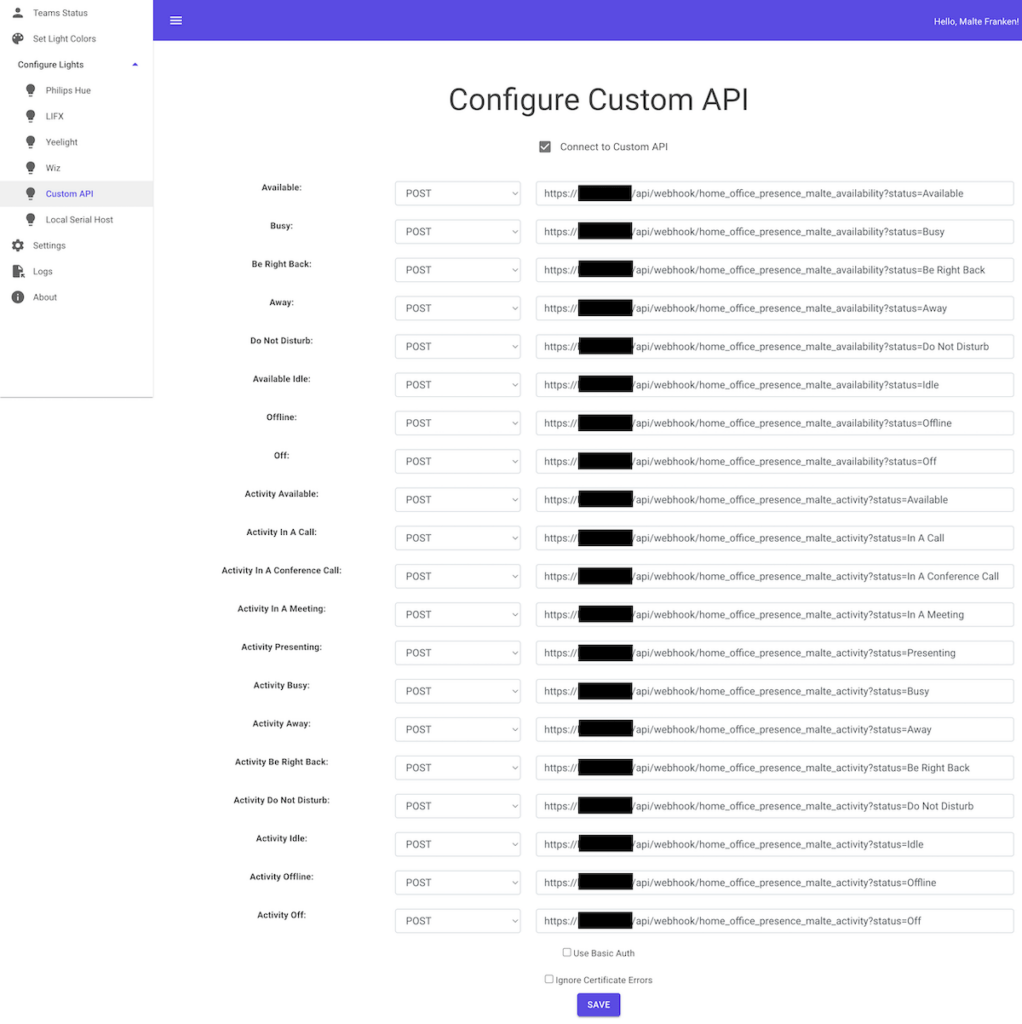
The next step is to go to the Custom API page in the PresenceLight web UI and configure the URLs that update your status in Home Assistant, and start by ticking the checkbox at the very top of the page.
- The API Method must be set to
POSTbecause that is the only method that Home Assistant webhooks support. - The base URL of course depends on how you have set up your Home Assistant and how it is accessible from the computer running PresenceLight. For example, if you run Home Assistant and PresenceLight on the same host, you are probably able to just use Home Assistant’s IP address without going through external hostnames or IP addresses.
- The path is
/api/webhook/[webhook ID]where the webhook ID must correspond with the one configured in the automation triggers. - If you decided to use Nabu Casa’s webhook integration the whole public URL including path is provided on the Home Assistant Cloud page. If you have already activated the webhook you can click on “Manage” to copy the public URL.
- Finally I added a URL parameter
statusthat carries the value, and which of course must correspond with the input select options.
The format for the first URL parameter is?status=[value]appended to the URL.
Caveat
There is one remaining caveat with the Docker setup that apparently cannot be avoided and that is you occasionally need to reload the PresenceLight web interface – at least once after the Docker container is (re)started – to renew the authentication token (see issue for more details). If you are using the same browser (i.e. same cookies) as before this should work instantaneously, but it may be necessary to do a full MFA re-authentication.
Home Assistant Configuration
I have not actually had to make any changes to the setup inside Home Assistant compared to using the PresenceLight desktop application on Windows 10. So, if you have come thus far, you should see you current Teams status reflected in the availability and activity entities in Home Assistant.
Outlook
For now I resolved my immediate need to share my Teams status in Home Assistant on my dashboard and the ability to automate certain things. However, this setup is still missing information about whether I am currently muted or unmuted – something that PresenceLight and the Graph API cannot provide.
There are some promising recent developments that I will keep a close eye on which are based on a local API for Teams that not only provides status information from Teams but also allows for changing certain meeting properties. Example implementations are a Teams MQTT bridge (written in C# for Windows), a generic client (written in C#), and another MQTT bridge (written in Node.js).
| Compatibility |
|---|
| At the time of writing this post, I used: * Home Assistant 2023.2.5 * Microsoft Teams 1.6.00.1159 on macOS Ventura 13.2 * PresenceLight Docker container 5.5.38 |
Leave a Reply