When we bought a new Brilliant Bahama ceiling fan for the living room recently, style was deemed more important than an easy home automation integration. The fan came with an RF remote control , so I thought to give the RF route a go to integrate this ceiling fan into Home Assistant for local control.
RF Bridge
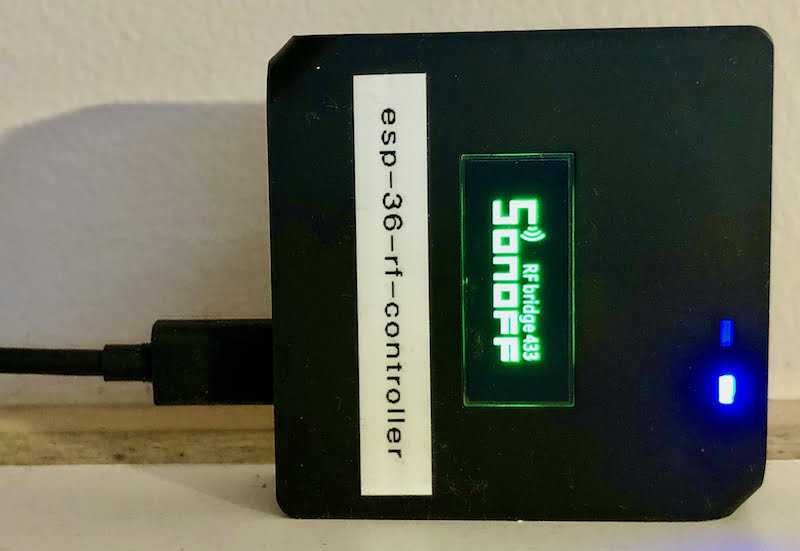
Looking for an RF bridge quickly led me to the quite reasonably priced Sonoff 433 RF Bridge. It’s a small device powered by a USB cable that you can easily hide on a shelf or cupboard.
There are a couple of options flashing alternative firmwares like Tasmota or ESPurna onto the device. However, all these options require making some hardware changes (Clarification: ESPurna only requires hardware modifications if you want support for additional protocols.)
Luckily ESPHome recently added support for the Sonoff RF Bridge into its development version and this does not even require any hardware modifications. ESPHome is my preferred custom firmware option due to its great integration in Home Assistant and general ease of use.
Serial Flashing
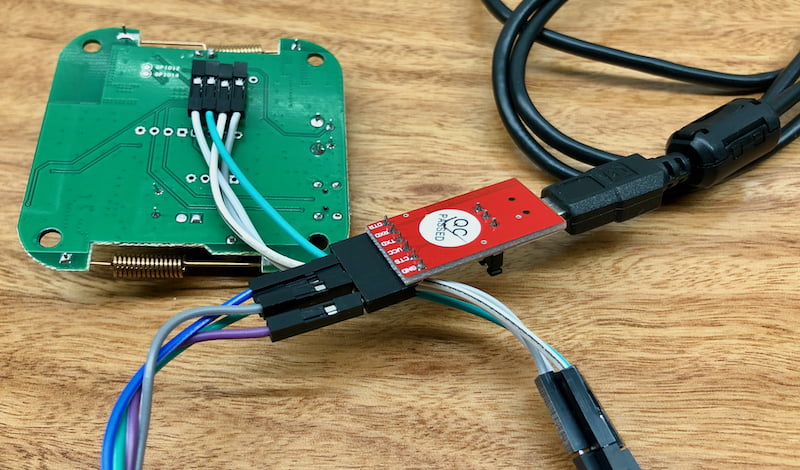
I am not aware if there would have been an option to flash OTA out of the box, but instead I used a serial connection. I know I just said that no hardware modifications would be required and now I am going to solder some pin headers onto the board, but compared with the hardware modifications required for Tasmota or ESPurna to work, the pin header is a rather simple change. You may even be able to get away with just temporarily holding cables to the board or sticky-taping them on. The connection is really just required for a couple of minutes.
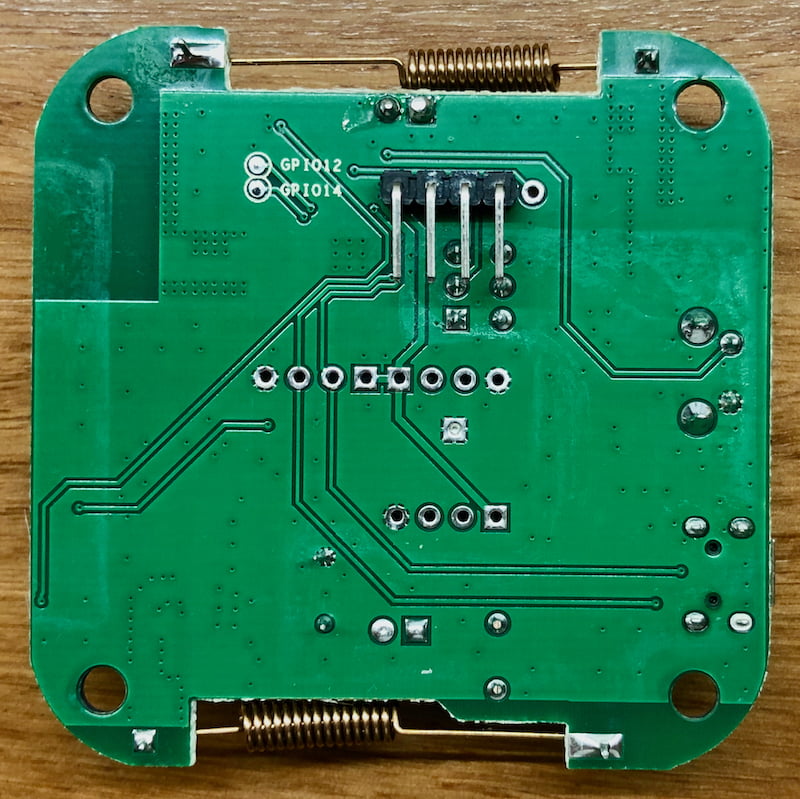
Access to the device’s hardware is quite easy. After opening the case it turned out that I had the R2 version 1.0 board. You only have to bend the large LED out of the way to be able to solder on some pins for the serial connection. There is a switch on the board that you will need to switch to ON to get the device into flash mode, and turn OFF after flashing to boot into normal mode.
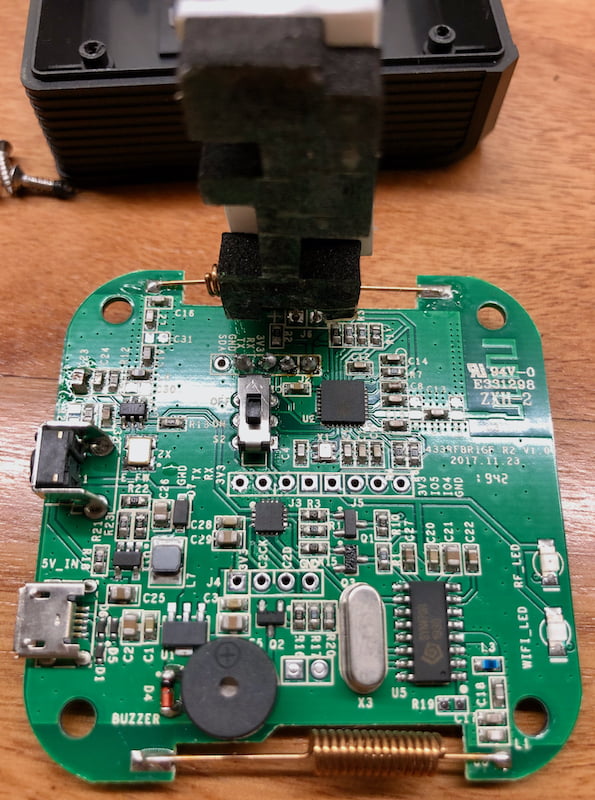
I decided to use right angle pin headers, soldered from the top and sticking out at the bottom. That way I could just keep them on board and they just fit in the box.
ESPHome firmware
ESPHome development version
I am running ESPHome from the command line. To be able to have the current stable version and the development version available at the same time I created a new venv and then followed the guide to install the development version: pip install https://github.com/esphome/esphome/archive/dev.zip.
Apply bugfix
At the time of writing this post, the development version of ESPHome contains a bug that prevents any codes to be transmitted through the RF Bridge. Special thanks to user JeeCeetje on the Home Assistant community forum for finding this issue and providing a fix!
void RFBridgeComponent::send_code(RFBridgeData data) {
  ESP_LOGD(TAG, "Sending code: sync=0x%04X low=0x%04X high=0x%04X code=0x%06X", data.sync, data.low, data.high,
           data.code);
  this->write(RF_CODE_START);
  this->write(RF_CODE_RFOUT);
  this->write((data.sync >> 8) & 0xFF);
  this->write(data.sync & 0xFF);
  this->write((data.low >> 8) & 0xFF);
  this->write(data.low & 0xFF);
  this->write((data.high >> 8) & 0xFF);
  this->write(data.high & 0xFF);
  this->write((data.code >> 16) & 0xFF);
  this->write((data.code >> 8) & 0xFF);
  this->write(data.code & 0xFF);
  this->write(RF_CODE_STOP);
  this->flush();
}
To apply that fix:
- In your development virtual environment find file
lib/python3.7/site-packages/esphome/components/rf_bridge/rf_bridge.cpp. - In that file find the line
void RFBridgeComponent::send_code(RFBridgeData data) { - Remove this line and the next 10 lines up until and including the line that contains
} - Copy above code fix into that file.
Just to make sure that this code is actually baked into your new firmware, I would recommend cleaning your build directory (esphome your_config.yaml clean) before generating and uploading the new firmware.
Serial Connection
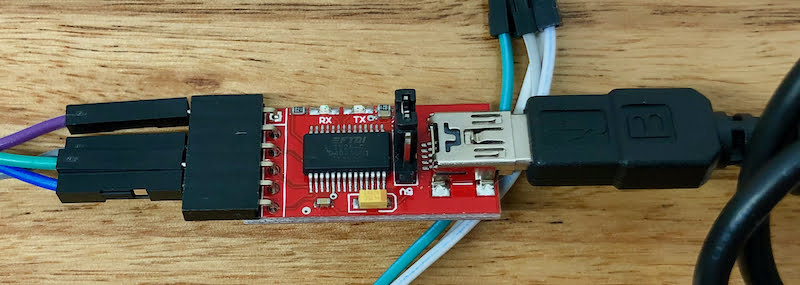
For the serial connection I use a standard FTDI adapter connected via USB to my MacBook, and after connecting this serial adapter to the pins on the RF Bridge, it’s available as a device in macOS, and recognised by the ESPHome command line tool.
ESPHome Configuration
The following is my full ESPHome configuration for the Sonoff RF Bridge. It’s primarily based on the sample code provided, complemented by the standard sensors I add to monitor my devices.
substitutions:
  devicename: esp_rf_bridge
  display_devicename: ESP RF Bridge
  use_ip_address: 192.168.xx.yy

esphome:
  name: ${devicename}
  platform: ESP8266
  board: esp8285

logger:
  baud_rate: 0

wifi:
  ssid: !secret wifi_ssid
  password: !secret wifi_password
  use_address: ${use_ip_address}
  power_save_mode: none

ota:
  password: !secret ota_password

web_server:
  port: 80

uart:
  tx_pin: GPIO01
  rx_pin: GPIO03
  baud_rate: 19200

api:
  password: !secret api_password
  services:
    - service: send_code
      variables:
        sync: int
        low: int
        high: int
        code: int
      then:
        - rf_bridge.send_code:
            sync: !lambda 'return sync;'
            low: !lambda 'return low;'
            high: !lambda 'return high;'
            code: !lambda 'return code;'
    - service: learn
      then:
        - rf_bridge.learn

rf_bridge:
  on_code_received:
    then:
      - homeassistant.event:
          event: esphome.rf_code_received
          data:
            sync: !lambda 'return format_hex(data.sync);'
            low: !lambda 'return format_hex(data.low);'
            high: !lambda 'return format_hex(data.high);'
            code: !lambda 'return format_hex(data.code);'

binary_sensor:
  - platform: status
    name: "${display_devicename} Status"
    on_state:
      then:
        - light.toggle: wifi_led
  - platform: gpio
    pin: GPIO00
    name: "${display_devicename} Pairing Button"

light:
  - platform: binary
    name: "${display_devicename} WiFi LED"
    id: wifi_led
    output: output_wifi_led
    internal: True

output:
  - platform: gpio
    pin:
      number: GPIO13
      inverted: True
    id: output_wifi_led

sensor:
  - platform: uptime
    name: "${display_devicename} Uptime"
    id: uptime_seconds
  - platform: wifi_signal
    name: "${display_devicename} WiFi Signal"

switch:
  - platform: restart
    name: "${display_devicename} Restart"

text_sensor:
  - platform: version
    name: "${display_devicename} Version"
  - platform: wifi_info
    ip_address:
      name: "${display_devicename} IP Address"
  - platform: template
    name: "${display_devicename} Uptime Readable"
    lambda: |-
      uint32_t dur = id(uptime_seconds).state;
      int dys = 0;
      int hrs = 0;
      int mnts = 0;
      if (dur > 86399) {
        dys = trunc(dur / 86400);
        dur = dur - (dys * 86400);
      }
      if (dur > 3599) {
        hrs = trunc(dur / 3600);
        dur = dur - (hrs * 3600);
      }
      if (dur > 59) {
        mnts = trunc(dur / 60);
        dur = dur - (mnts * 60);
      }
      char buffer[17];
      sprintf(buffer, "%ud, %02u:%02u:%02u", dys, hrs, mnts, dur);
      return {buffer};
    icon: mdi:clock-start
    update_interval: 60s
Home Assistant Services
After flashing the RF Bridge and adding the device to Home Assistant, you should find 2 new service you can use.
esphome.esp_rf_bridge_learnesphome.esp_rf_bridge_send_code
The esphome.esp_rf_bridge_send_code service will later play an important role when defining scripts that send RF codes to the fan.
Finding RF codes
The RF Bridge integration doco mentions the learn mode that you would need to put your bridge into to actually capture new codes. However, I am pretty sure that my bridge started logging codes it received without activating that learn mode.
You probably already know that you can connect to your ESPHome device remotely and view its logs from the command line (esphome your_config.yaml logs) and you should then see log entries like the following when pressing a button on the remote control:
[15:31:31][D][rf_bridge:041]: Received RFBridge Code: sync=0x4844 low=0x0258 high=0x06E0 code=0xADAF09

I decided to focus on the important buttons for now. I skipped the buttons to activate a timer because Home Assistant allows me to have much more fine-granular control, as well as the buttons to control a light because this particular ceiling fan does not have a light attached.
| Button on Remote Control | Code logged |
| FAN ON | sync=0x483A low=0x0258 high=0x06E0 code=0xADAF09 |
| FAN OFF | sync=0x4830 low=0x0244 high=0x06F4 code=0xADAF03 |
| 1 | sync=0x4826 low=0x024E high=0x06EA code=0xADAF05 |
| 2 | sync=0x4808 low=0x0244 high=0x06F4 code=0xADAF02 |
| 3 | sync=0x47F4 low=0x0258 high=0x06D6 code=0xADAF0E |
| 4 | sync=0x4826 low=0x0258 high=0x06D6 code=0xADAF0B |
| 5 | sync=0x483A low=0x0258 high=0x06E0 code=0xADAF07 |
| F/R | sync=0x4830 low=0x0258 high=0x06D6 code=0xADAF0F |
Each log entry consists of 4 data points – sync, low, high and code. The key here is the code bit, while the other three values vary a little bit with each button press.
Please note that each value is an integer in hexadecimal format. We will have to keep that in mind when using these values later on to control devices.
Home Assistant Configuration
Keeping State
We are going to create a template fan and we need to keep track of its state with an input_boolean for the state and an input_select for the speed.
input_boolean:
  fan_living_room_state:
    name: Fan Living Room State

input_select:
  fan_living_room_speed:
    name: Fan Living Room Speed
    options:
      - '1'
      - '2'
      - '3'
      - '4'
      - '5'
Scripts to turn the fan on and off
I implemented two scripts that turn the fan on or off. As you can see this is where the connection to the RF Bridge comes back into play. The fan_living_room_on script takes care of the sending the correct speed code to the fan, depending on what is currently selected in the input_select defined above, and turns the input_boolean on.
Please note that there are two options to define the codes here: I decided to keep the actual hexadecimal value in the code which requires that awkward syntax to keep it as an integer value (otherwise it would be interpreted as a string). The alternative is to convert from hexadecimal to decimal numbers, so for example you could replace {{ '0xADAF05' | int(0,16) }} with 11382533, if you prefer that syntax.
Script fan_living_room_off is much simpler end just sends the code to turn the fan off, and turns the input_boolean off.
script:
  # Living Room Fan
  fan_living_room_on:
    alias: "Living Room Fan On"
    sequence:
      - service: input_boolean.turn_on
        data:
          entity_id: input_boolean.fan_living_room_state
      - service: esphome.esp_rf_bridge_send_code
        data_template:
          code: >
            {% if is_state('input_select.fan_living_room_speed', '1') %}
              {{ '0xADAF05' | int(0,16) }}
            {% elif is_state('input_select.fan_living_room_speed', '2') %}
              {{ '0xADAF02' | int(0,16) }}
            {% elif is_state('input_select.fan_living_room_speed', '3') %}
              {{ '0xADAF0E' | int(0,16) }}
            {% elif is_state('input_select.fan_living_room_speed', '4') %}
              {{ '0xADAF0B' | int(0,16) }}
            {% elif is_state('input_select.fan_living_room_speed', '5') %}
              {{ '0xADAF07' | int(0,16) }}
            {% endif %}"
          sync: 0x4800
          low: 0x0250
          high: 0x700
  fan_living_room_off:
    alias: "Living Room Fan Off"
    sequence:
      - service: esphome.esp_rf_bridge_send_code
        data:
          code: 0xADAF03
          sync: 0x4800
          low: 0x0250
          high: 0x700
      - service: input_boolean.turn_off
        data:
          entity_id: input_boolean.fan_living_room_state
Template Fan
The following fan definition basically just ties all the above into a single entity.
fan:
- platform: template
fans:
fan_living_room:
friendly_name: "Fan Living Room"
value_template: "{{ states('input_boolean.fan_living_room_state') }}"
speed_template: "{{ states('input_select.fan_living_room_speed') }}"
turn_on:
service: script.fan_living_room_on
turn_off:
service: script.fan_living_room_off
set_speed:
service: input_select.select_option
data_template:
entity_id: input_select.fan_living_room_speed
option: "{{ speed }}"
speeds:
- '1'
- '2'
- '3'
- '4'
- '5'
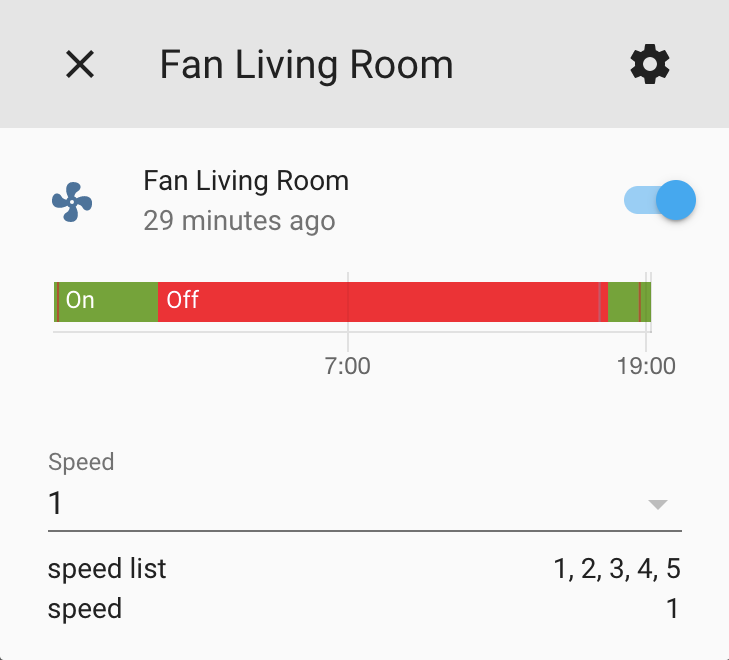
availability_template: "{{ is_state('binary_sensor.esp_rf_bridge_status', 'on') }}"As expected a fan entity is now available in Home Assistant that lets me turn the fan on and off and select the speed I want.
The RF Bridge is now about 4 metres away from the ceiling fan, and I have also put it about 12 metres away for a couple of days. All commands were received and transmitted successfully as far as I can tell.
Automations for the Living Room
We have two heaters in our living room – a wall-mounted electric heater and a slow combustion heater running on firewood – that both take turns to keep us warm during winter. I can detect which heater is currently on – using a smart plug and measuring power consumption for the electric heater, and using an infrared temperature sensor for the slow combustion heater.

Our living room has a high ceiling so it is a good idea to try to move the warm air around, for example using a ceiling fan. I have set up a simple automation that turns on the ceiling fan 5 minutes after any of the heaters has been turned on. Likewise a second automation turns off the ceiling fan 5 minutes after all heaters have been turned off.
Thanks to the above prep work you can use the standard fan.turn_on and fan.turn_off services to control the fan.
I have not yet decided how to automate this ceiling fan in summer. During the day it could just be manually turned on and off. In the evenings I could tie the fan to the lights, a motion sensor and the TV.
Outlook
There are two thing that the integration based on RF codes does not provide: The fan does not give any feedback (other than a loud beep) to the RF Bridge to confirm that the command has been received successfully. And, when you use the supplied RF remote control to control the fan, state changes are not reflected in Home Assistant. The latter could possibly be implemented by adding an automation that listens for events coming from the RF Bridge and then changes the fan entity. The tricky part however is how to then avoid having Home Assistant again trigger the fan to make that state change. In other words, the above scripts and template fan need to be able to distinguish how the state change was triggered.
In a way the state shown in Home Assistant is an optimistic one. But as long as you are going to primarily control the fan through Home Assistant, e.g. through automations, the UI or a connected smart speaker, and you are nearby to see if the command has actually worked, this integration based on the Sonoff RF Bridge is a valuable addition to the smart home.
Compatibility
At the time of writing this post, I used:
- Home Assistant 0.111.3 with Python 3.7.5
- ESPHome 1.5.0-dev
Update 19 June 2020
Just a small clarification: User 1technophile on the Home Assistant community forum pointed out that using ESPurna firmware does not actually require hardware modifications right from the outset. Only if you want to support additional protocols then some modifications are required.
Update 07 December 2020
In the meantime I have updated my RF Bridge to the current stable ESPHome version 1.15.3. And I have implemented two automations that listen to events triggered by using the RF remote control.
The following sample automations work with my fan controller and remote and the entity names I used above.
Automation – State Change
The following automation listens to any events coming from the RF Bridge and filters by the “FAN ON” and “FAN OFF” events. Depending on which code is received the corresponding service to turn the input_boolean on or off is chosen.
automation:
  - id: living_room_ceiling_fan_rf_codes_state
    alias: Living Room Ceiling Fan RF Codes (State)
    mode: queued
    max: 10
    trigger:
      - platform: event
        event_type: esphome.rf_code_received
    condition:
      - condition: template
        value_template: '{{ trigger.event.data.code == "00adaf09" or trigger.event.data.code
        == "00adaf03" }}'
    action:
      - service: '{% if (trigger.event.data.code == "00adaf09") %}input_boolean.turn_on{%
      else %}input_boolean.turn_off{% endif %}'
        data:
          entity_id: input_boolean.fan_living_room_state
Automation – Speed Change
Similar to the automation above, this one filters by the 5 fan speed codes, and then simply sets the input_select to the correct speed value.
automation:
  - id: living_room_ceiling_fan_rf_codes_speed
    alias: Living Room Ceiling Fan RF Codes (Speed)
    mode: queued
    max: 10
    trigger:
      - platform: event
        event_type: esphome.rf_code_received
    condition:
      - condition: template
        value_template: '{{ trigger.event.data.code == "00adaf05" or trigger.event.data.code
        == "00adaf02" or trigger.event.data.code == "00adaf0e" or trigger.event.data.code
        == "00adaf0b" or trigger.event.data.code == "00adaf07" }}'
    action:
      - service: input_select.select_option
        data:
          entity_id: input_select.fan_living_room_speed
          option: '{% if (trigger.event.data.code == "00adaf05") %}1 {% elif (trigger.event.data.code
          == "00adaf02") %}2 {% elif (trigger.event.data.code == "00adaf0e") %}3 {%
          elif (trigger.event.data.code == "00adaf0b") %}4 {% elif (trigger.event.data.code
          == "00adaf07") %}5 {% endif %}'
Update 02 May 2022
I made two changes to the above post after a recent comment (thanks to Warter).
- When sending codes to Home Assistant it is apparently now recommended to use method
format_hex(instead ofitoa) in the lambda. - The code that is then received in Home Assistant is prefixed with
00which means that all automations need to be changes. The safest way to confirm what is actually received is of course as always to use Home Assistant’s “List to events” feature and look at the actual code received at each button press.
Leave a Reply to Judah Teng Cancel reply