Still holding your breath after building your outside air quality sensor? Well, here comes the sequel where you are going to learn how to build a really simple but powerful indoor air quality sensor and how to process and present the sensor readings in Home Assistant.
We are mostly staying at home and working from home in this part of the world these days, and as such I wanted to get a better understanding of the air quality in our house. At the same time hazard reduction has started in the nearby national parks ahead of the bushfire season and you can smell the smoke in the air on some days.
IKEA has recently launched a new air quality sensor (VINDRIKTNING) which is very affordable and has already been hacked and integrated into Home Assistant. It uses a PM1006 sensor and measures particulate matter only. More on this in a future post.
For the following sensor I chose air quality components supported in ESPHome.
Bill of Material
- ESP32
- SDS011 sensor – measures particulate matter less than 2.5 and 10 µm in size
- SGP30 breakout board – measures CO2 and TVOC (total Volatile Organic Compounds)
- BME280 breakout board – measures temperature, humidity and air pressure
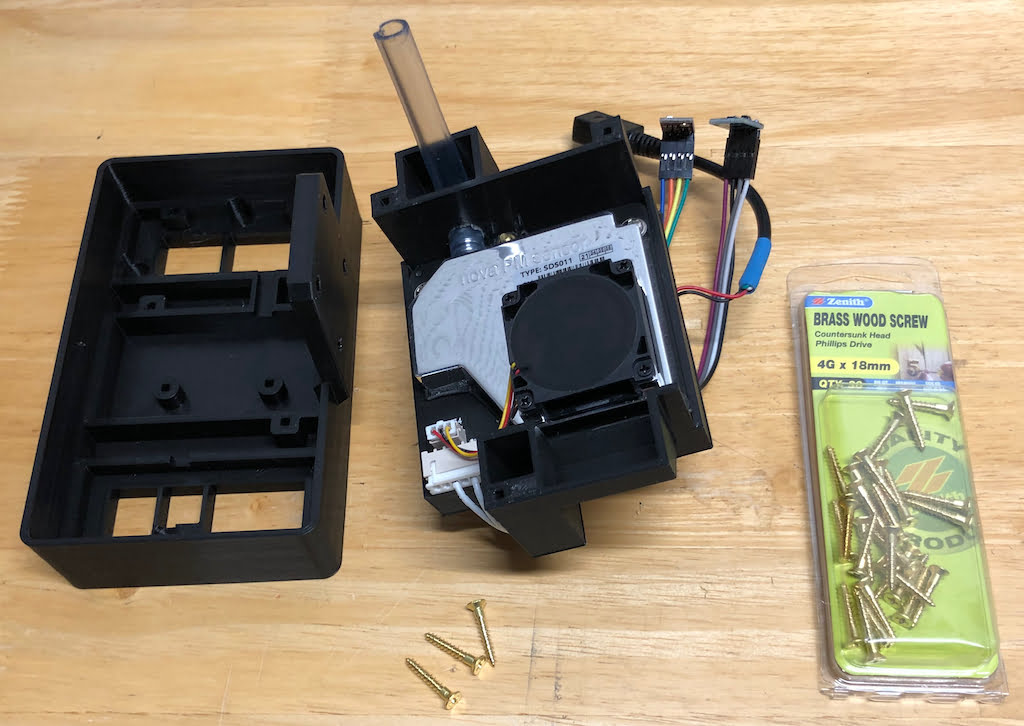
- Case – Awesome 3D-printed case available on Thingiverse (Environment monitoring station by RolandSautner is licensed under the Creative Commons – Attribution license.)
- Sundries such as screws, fly-screen, super glue
Specs
- Fine Dust (PM 10 and PM 2.5): 0.0 to 999.9 μg /m3, ±15% and ±10μg/m3
- CO2: 400 ppm to 60000 ppm
- Chemicals (TVOC): 0 ppb to 60000 ppb
- Temperature: -40 to 85°C, ±0.5°C to ±1.5°C
- Humidity: 0 to 100% relative humidty, ±3%
- Pressure: 300 to 1100 hPa, ±1.0hPa to ±1.7hPa
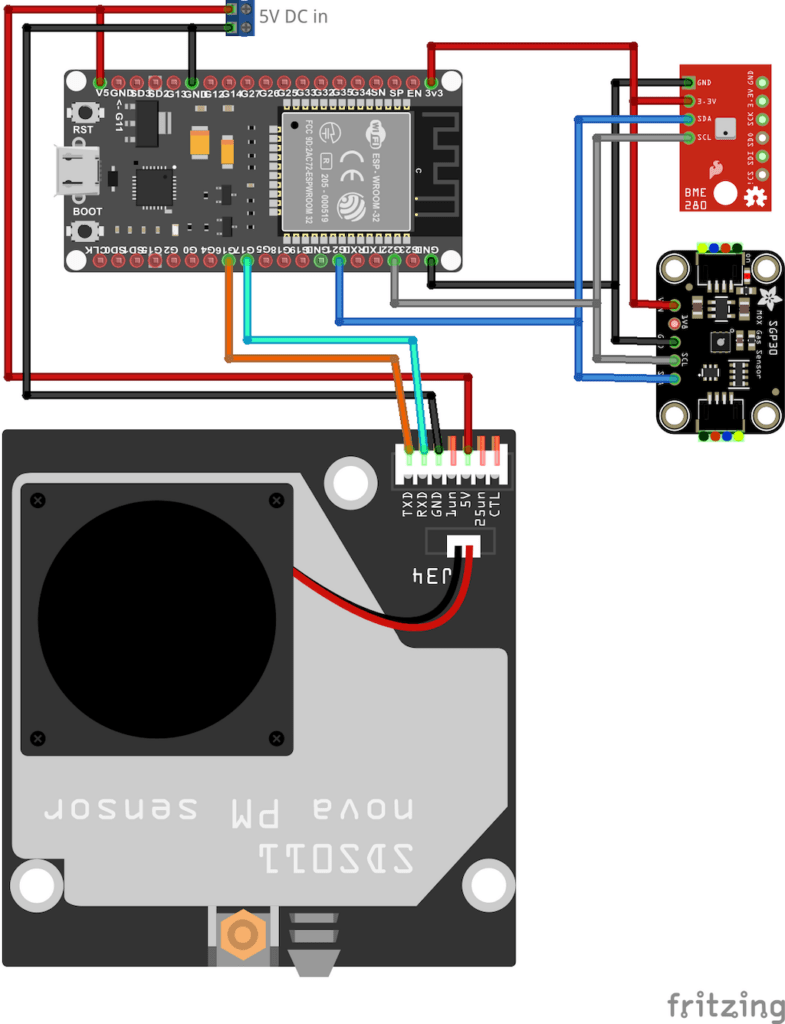
Wiring
The wiring of this sensor is really simple. The SDS011 sensor just requires a RX and TX pin as well as 5V and GND. The SGP30 and BME280 sensors are connected to the I2C bus and require 3.3V and GND to work.
| SDS011 Sensor | ESP |
|---|---|
| GND | GND |
| 5V | V5 |
| RXD | GPIO17 |
| TXD | GPIO16 |
| SGP30 Sensor | ESP |
|---|---|
| GND | GND |
| VCC | 3V3 |
| SDA | GPIO21 |
| SCL | GPIO22 |
| BME280 Sensor | ESP |
|---|---|
| GND | GND |
| VIN | 3V3 |
| SDA | GPIO21 |
| SCL | GPIO22 |
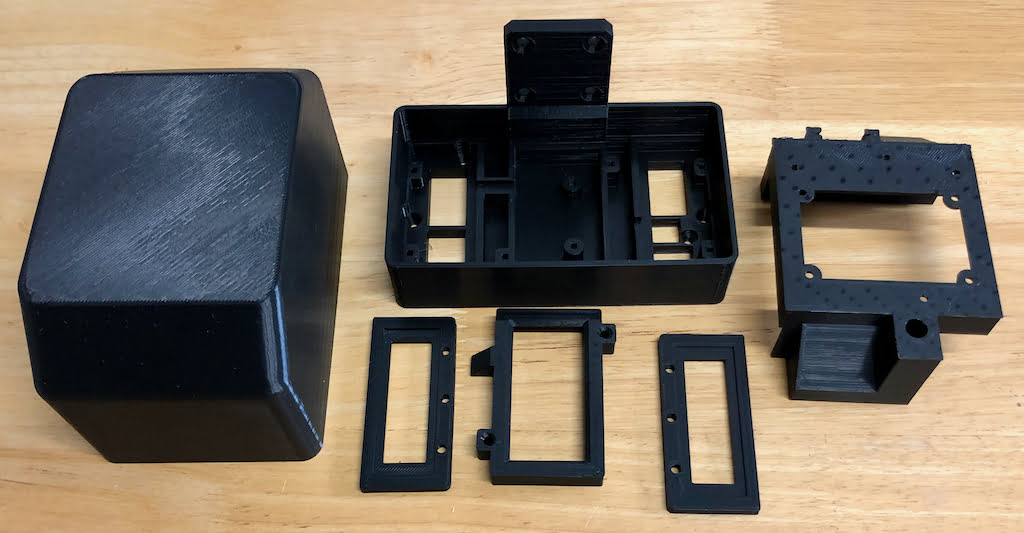
Assembly
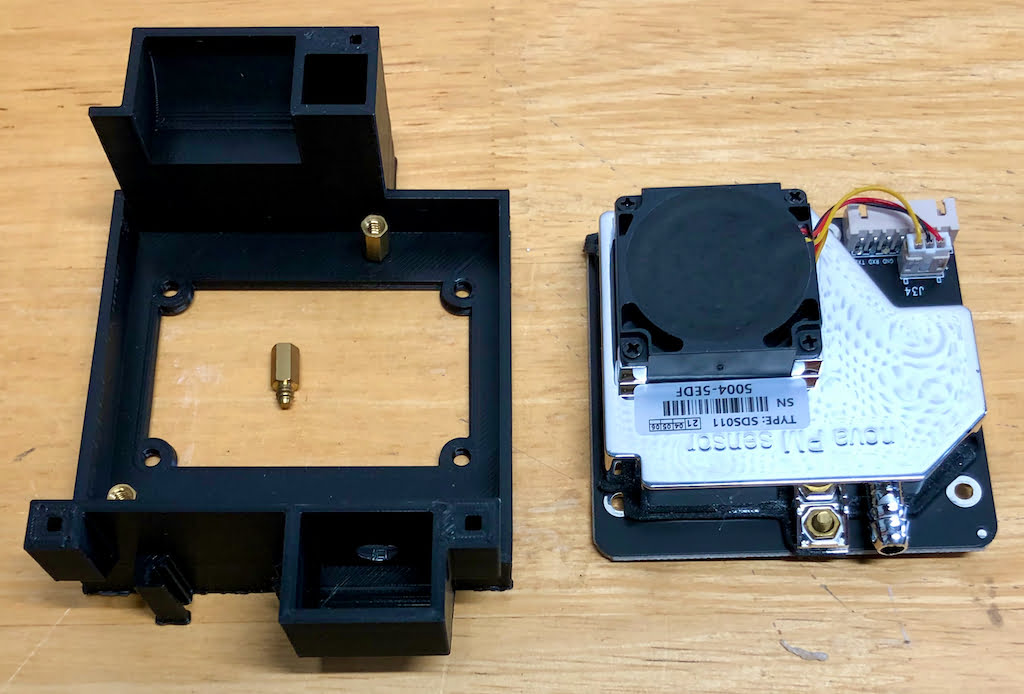
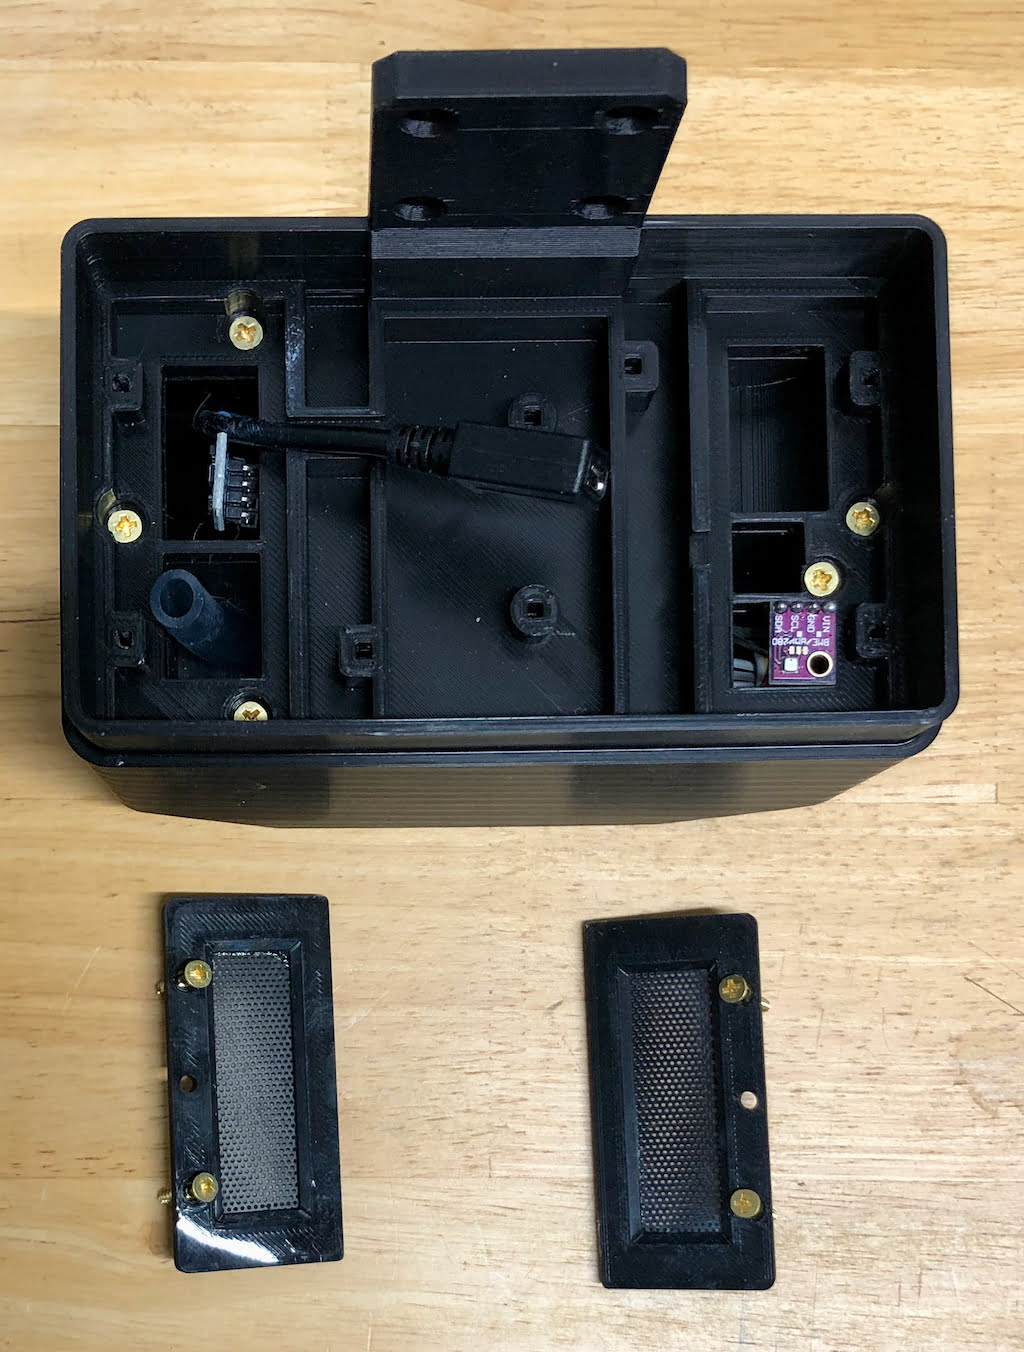
I printed the case parts without making any modifications despite the fact that I am using a BME280 sensor instead of the BME680 sensor that the case was designed for.
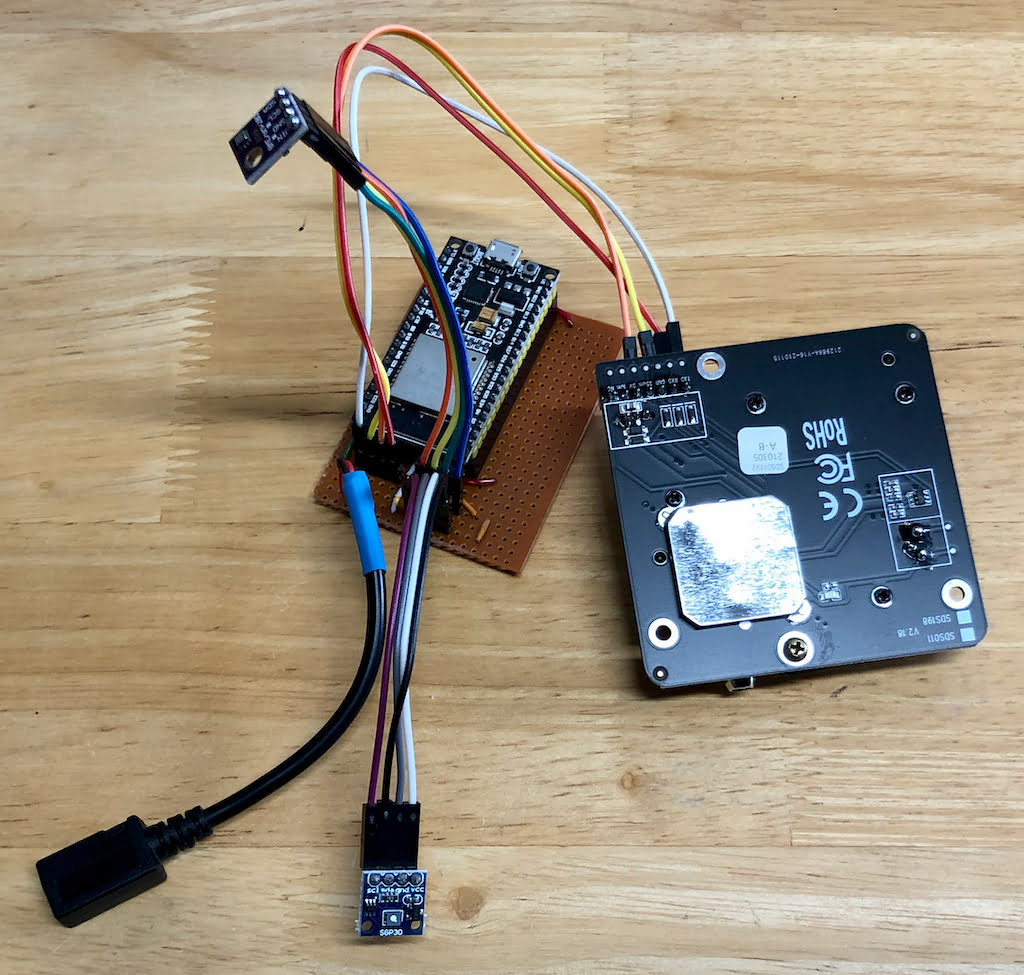
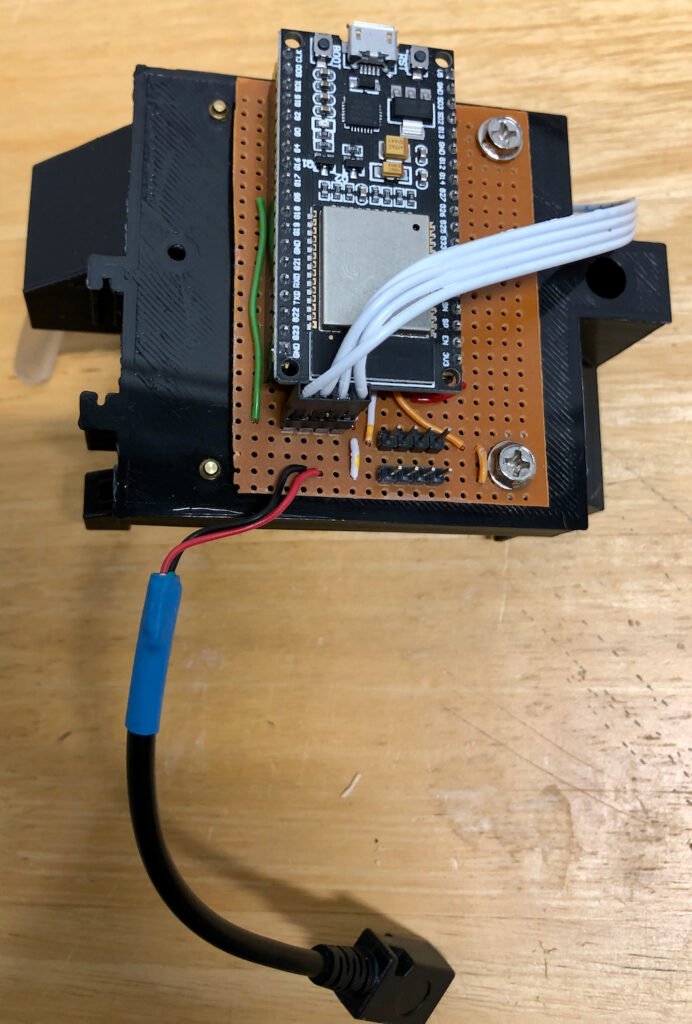
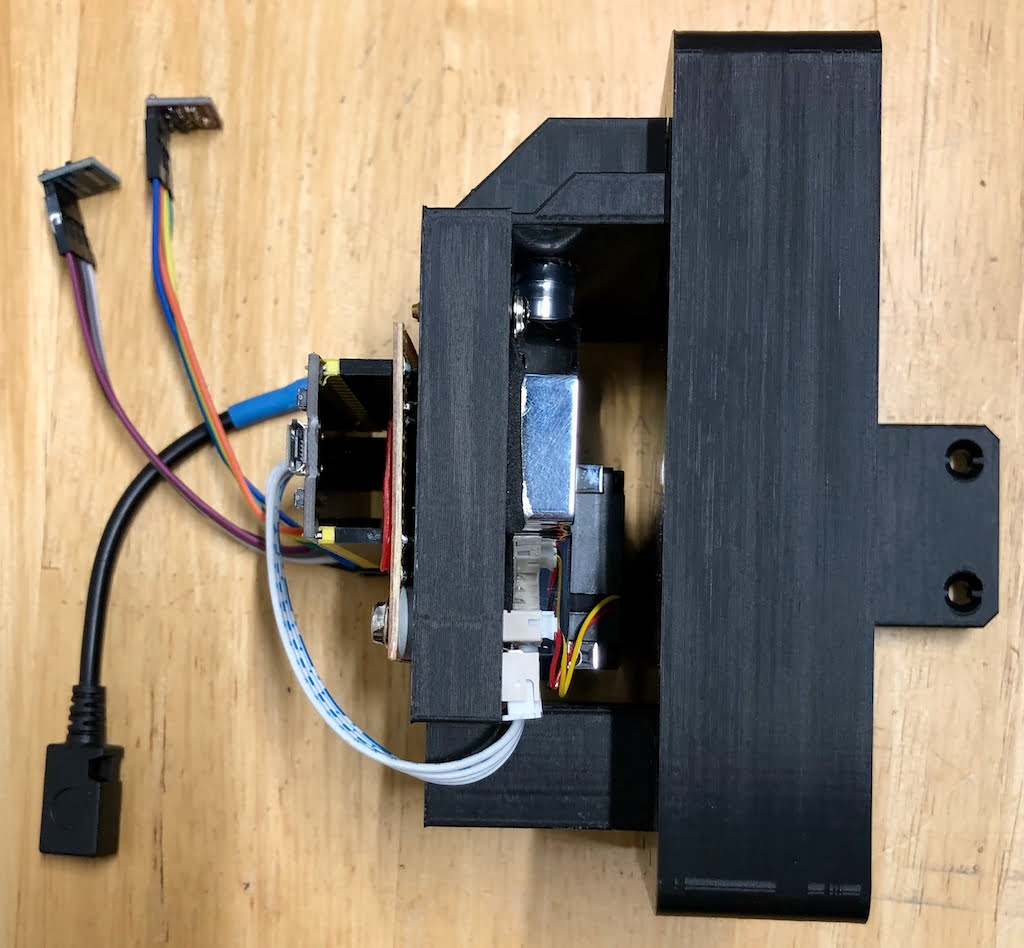
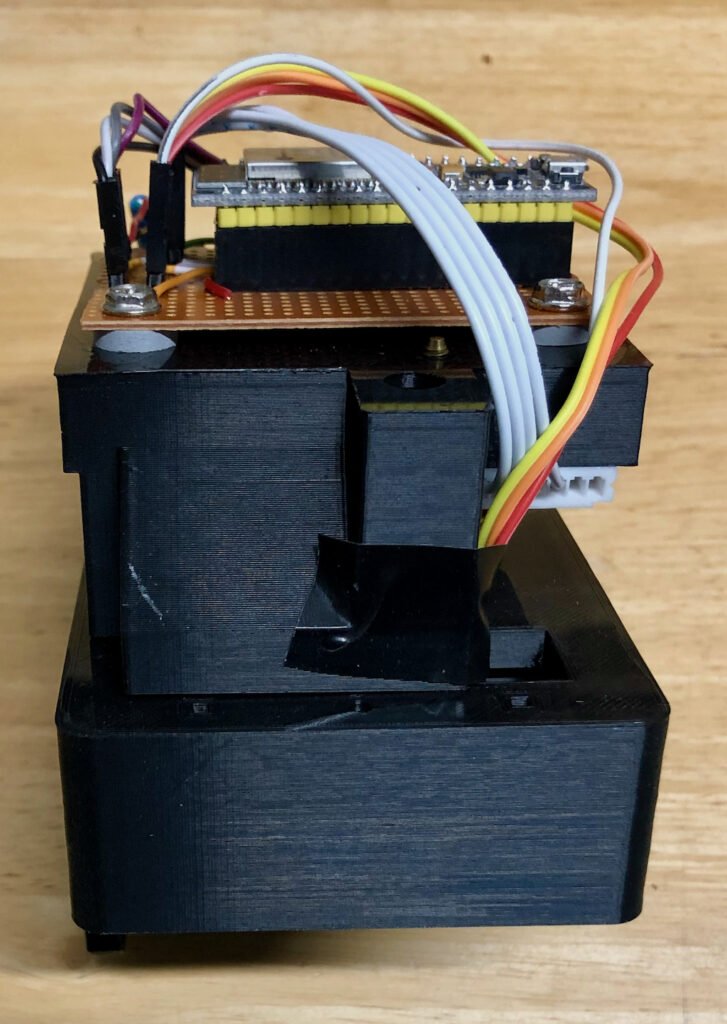
As usual I built a simple prototype PCB board just to get the wiring between ESP and sensors reasonably tidy.
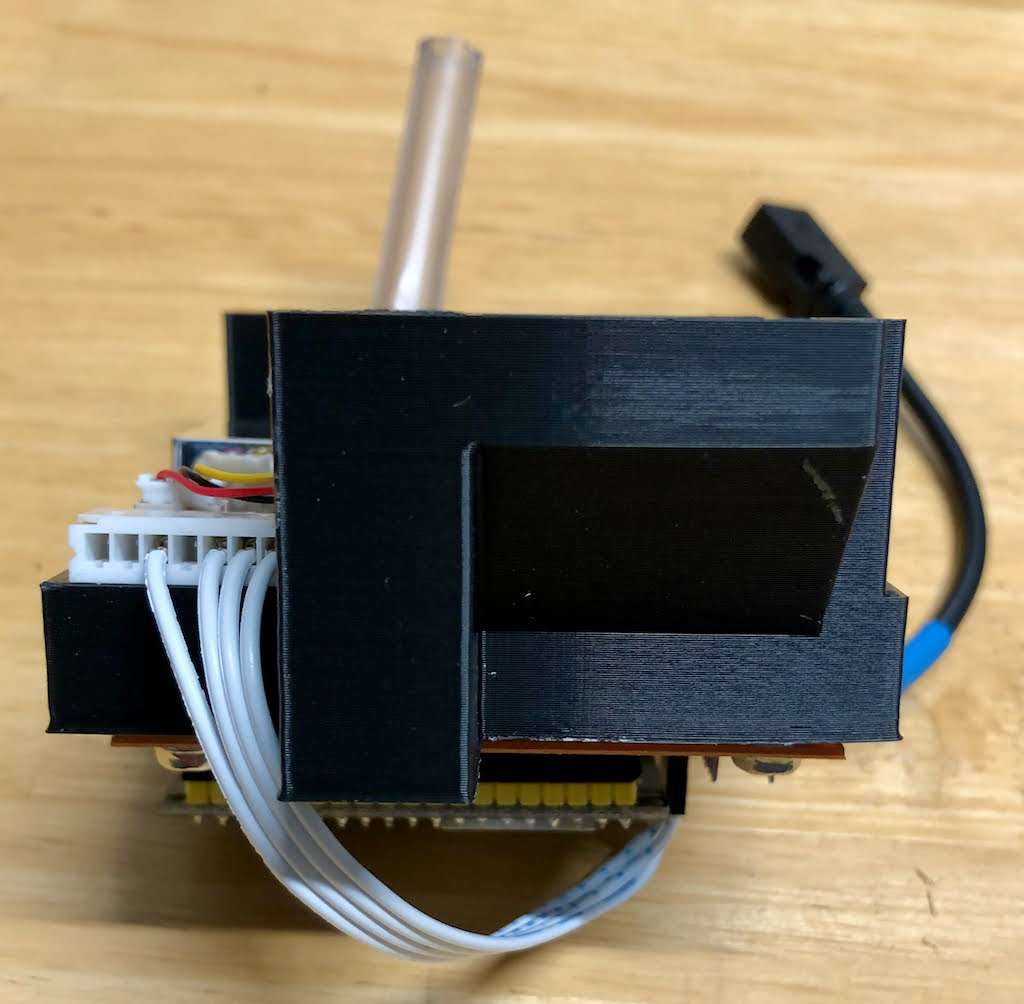
The SDS011 module is screwed under the top case part using small standoffs – I still had some old standoffs and screws left from PC assembly times.
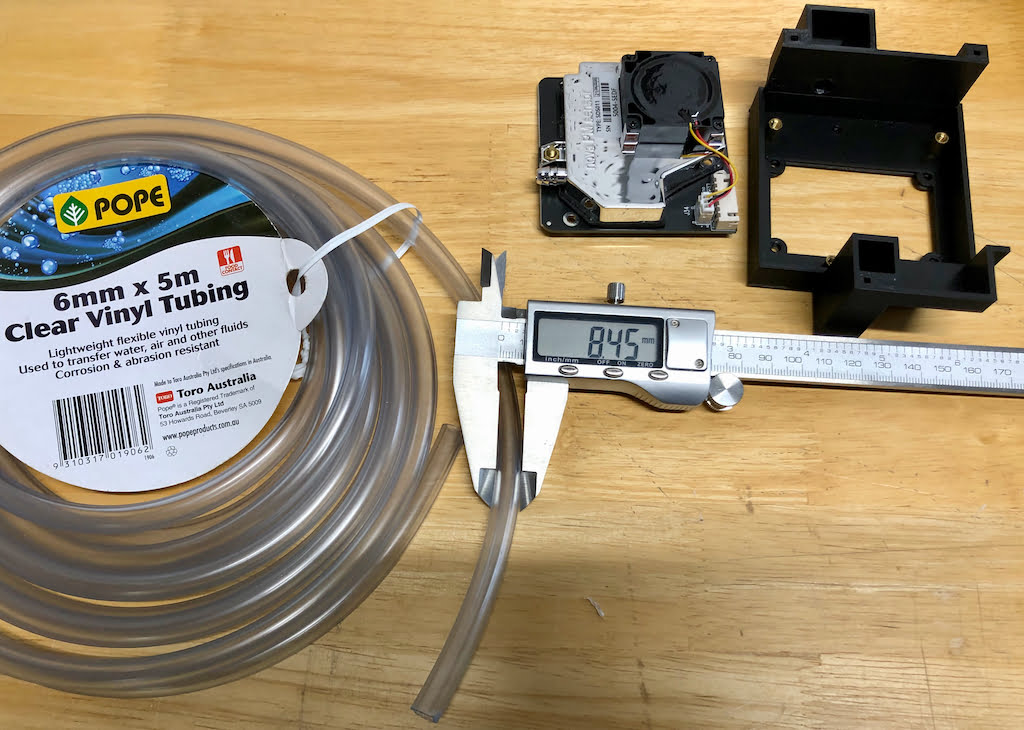
The next step is probably optional but I decided to use a piece of vinyl tube for the air intake of the SDS011 sensor.
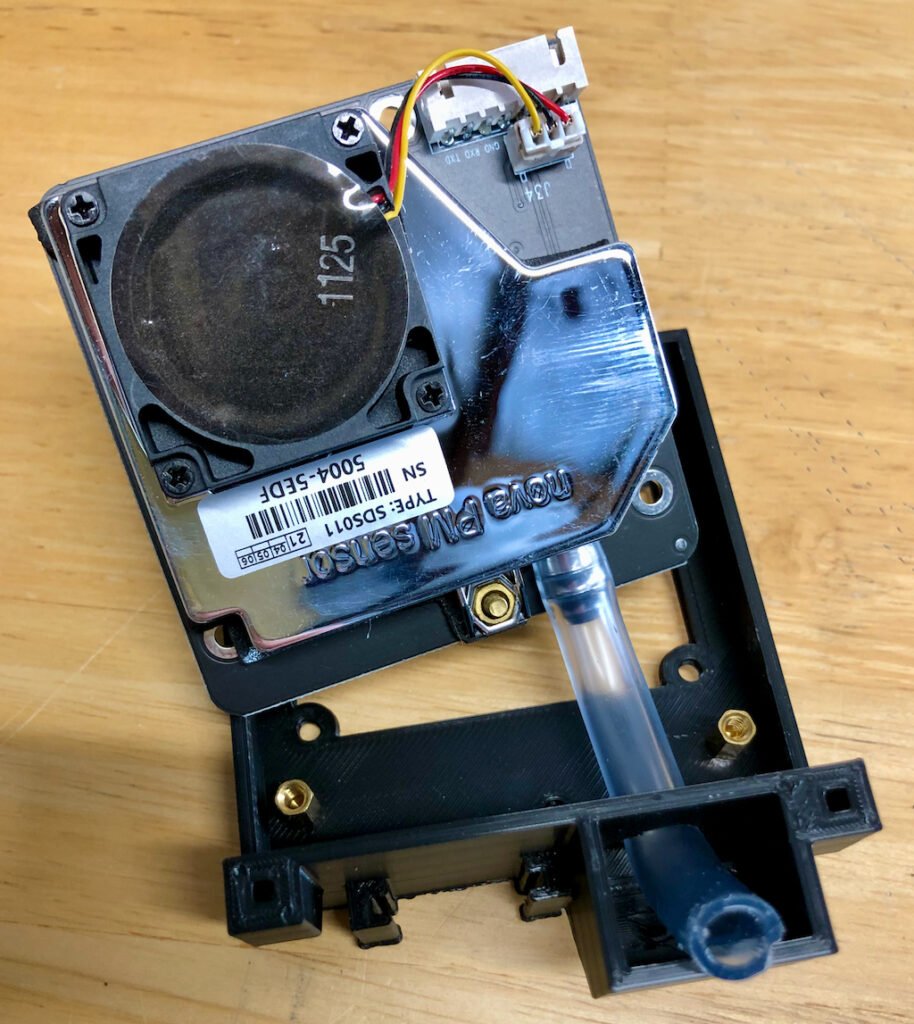
The prototype PCB board I used was just large enough to drill two holes into it so that I could screw the board onto the top part of the case.
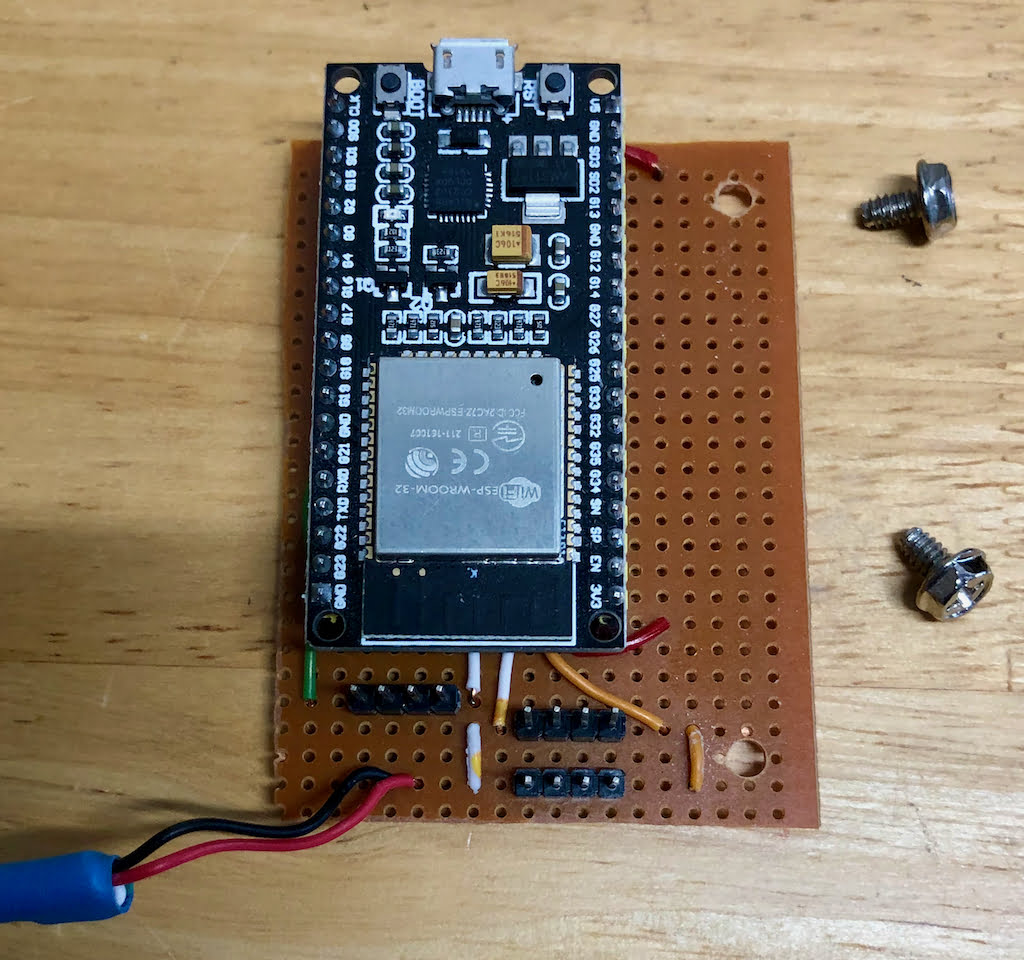
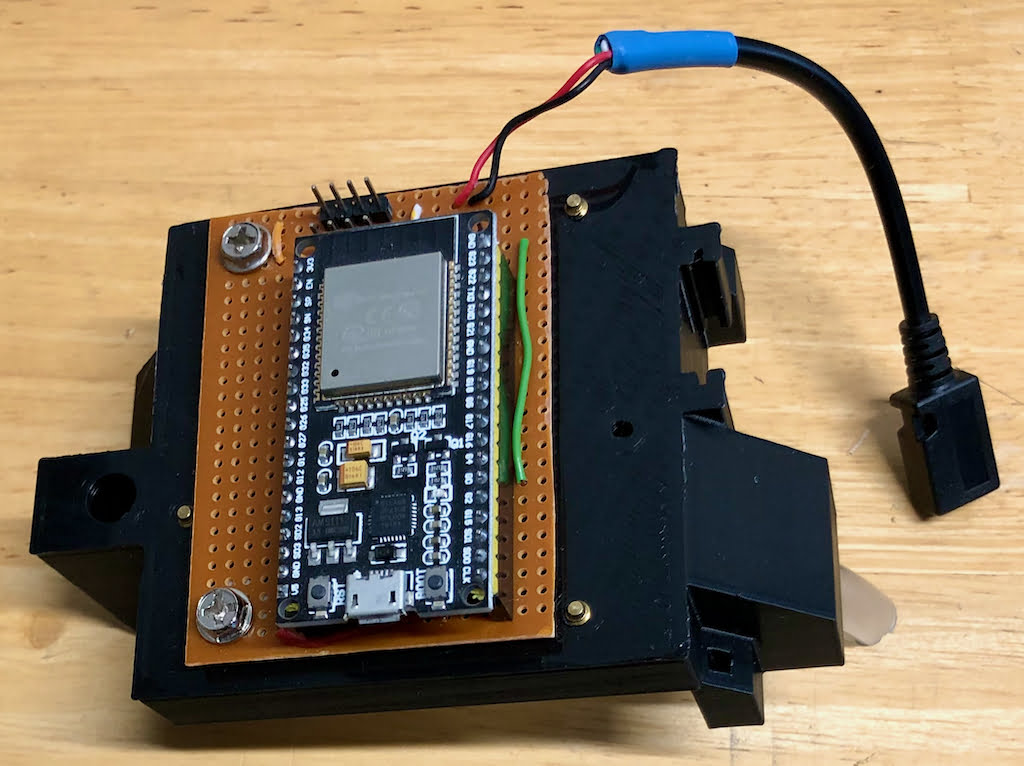
For the connection between ESP and SDS011 sensor I used a cable that came with the sensor and cut off the other end to then install socket headers for the ESP side.
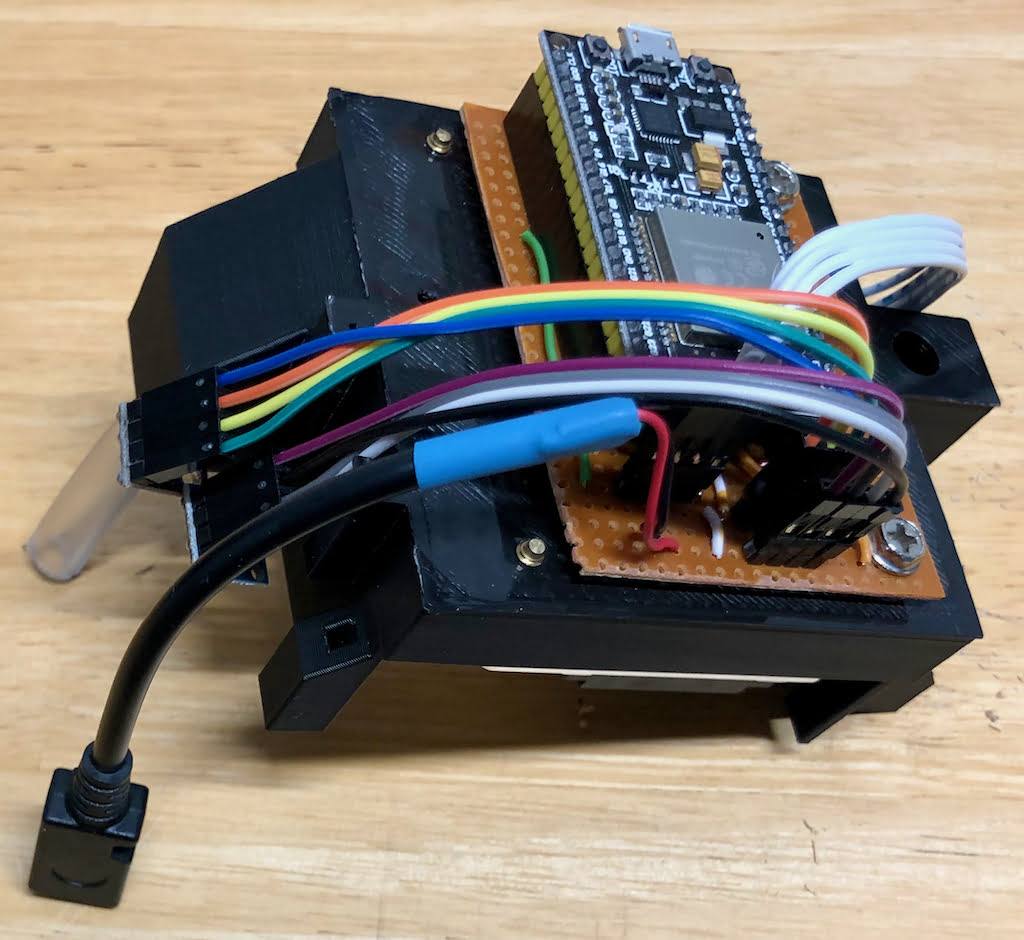
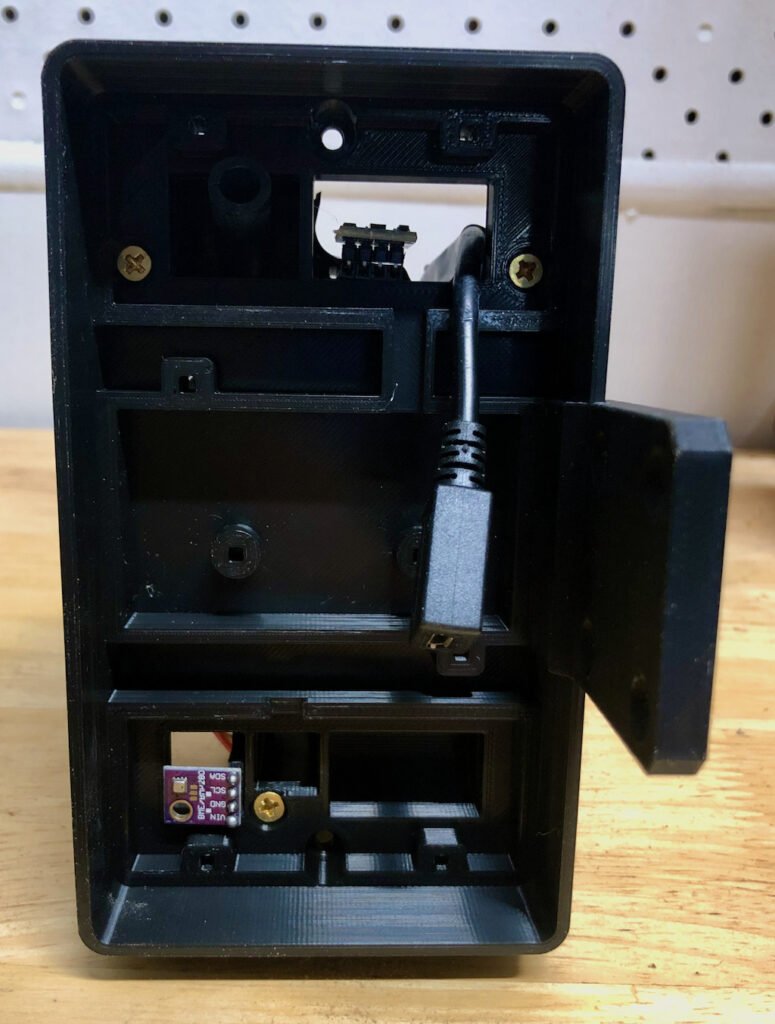
Originally I had both the BME280 and SGP30 sensors on the same side of the case but then realised that the SGP30 is heating up to measure chemicals and the BME280 would then measure the dissipated heat. And so the final assembly guides these two sensors out of the case on two separate sides.

To fix the top case part to the bottom part I just used 18mm wood screws.
The vinyl tube had to be cut a bit to not stick out too much because there will be a piece of fly screen mounted over the top.
As mentioned ealier, the SGP30 sensor is now sticking out on the right hand side…
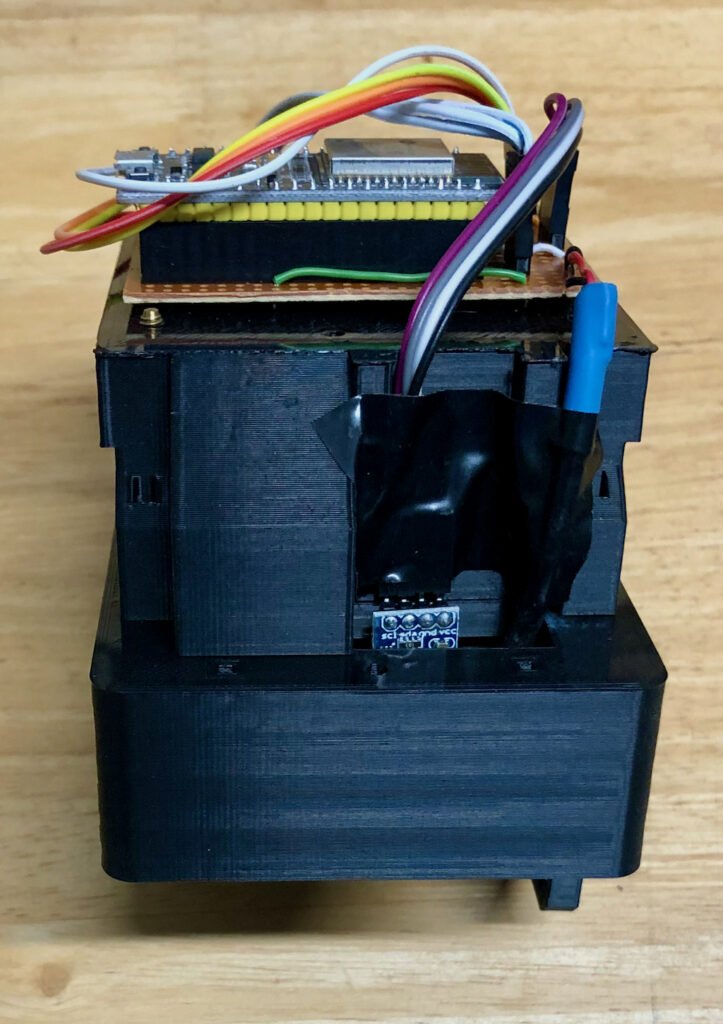
… and the BME280 on the left hand side so that the latter does not measure the heat dissipated by the SGP30 sensor.
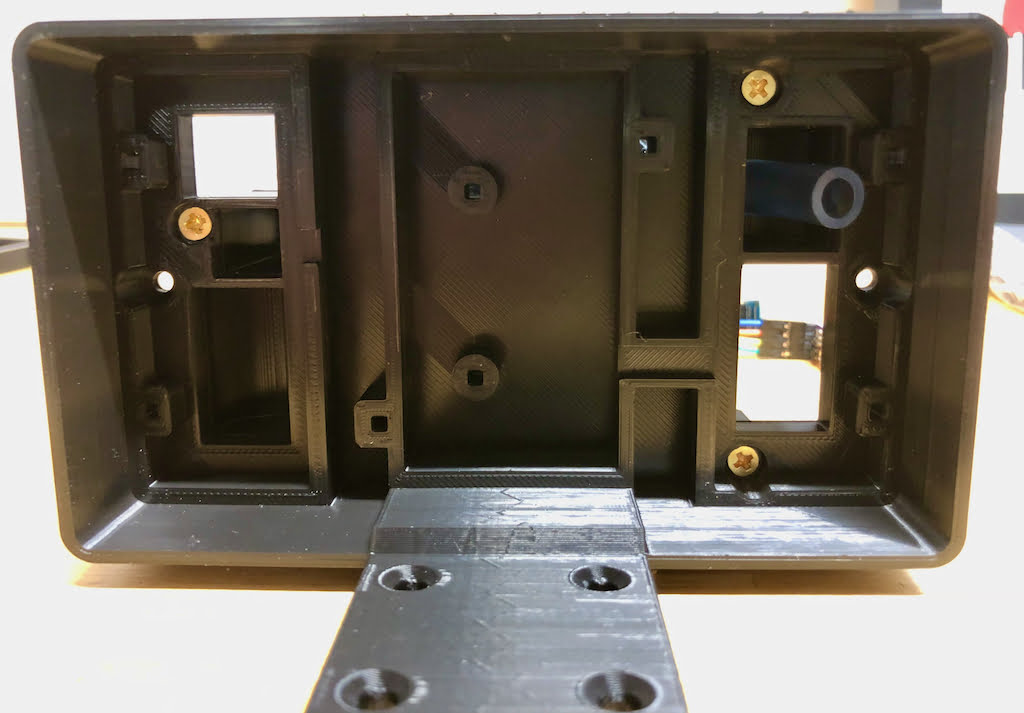
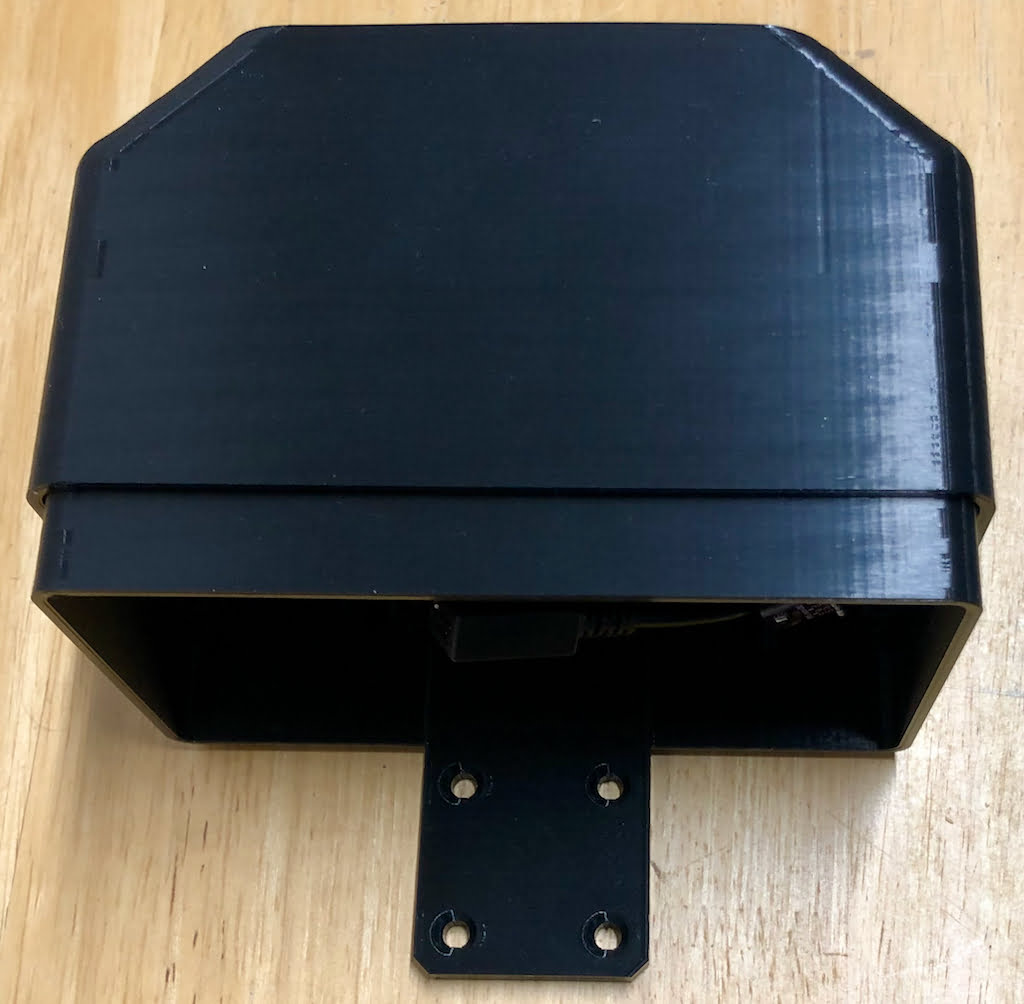
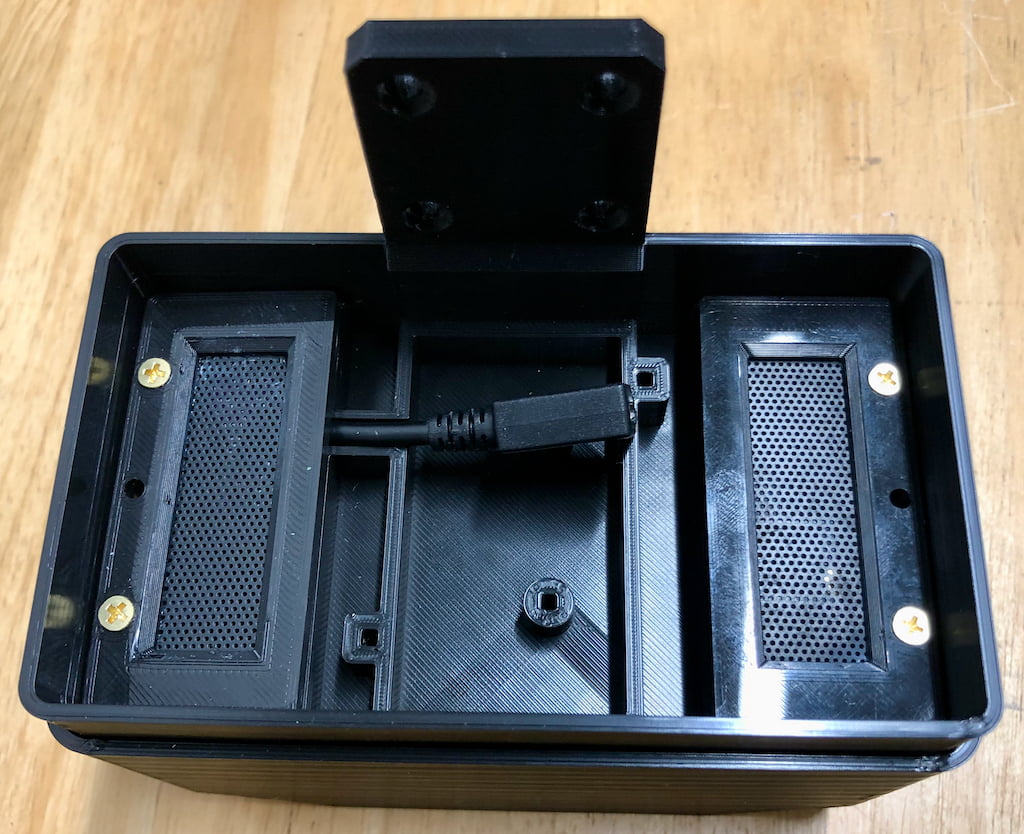
The top cover is slid over the top of the case and then fixed with 18mm wood screws from the bottom.
To protect the sensors from crawling and flying insects, the case comes with two small frames. I cut some plastic fly screen to size and simply glued it to these frames.
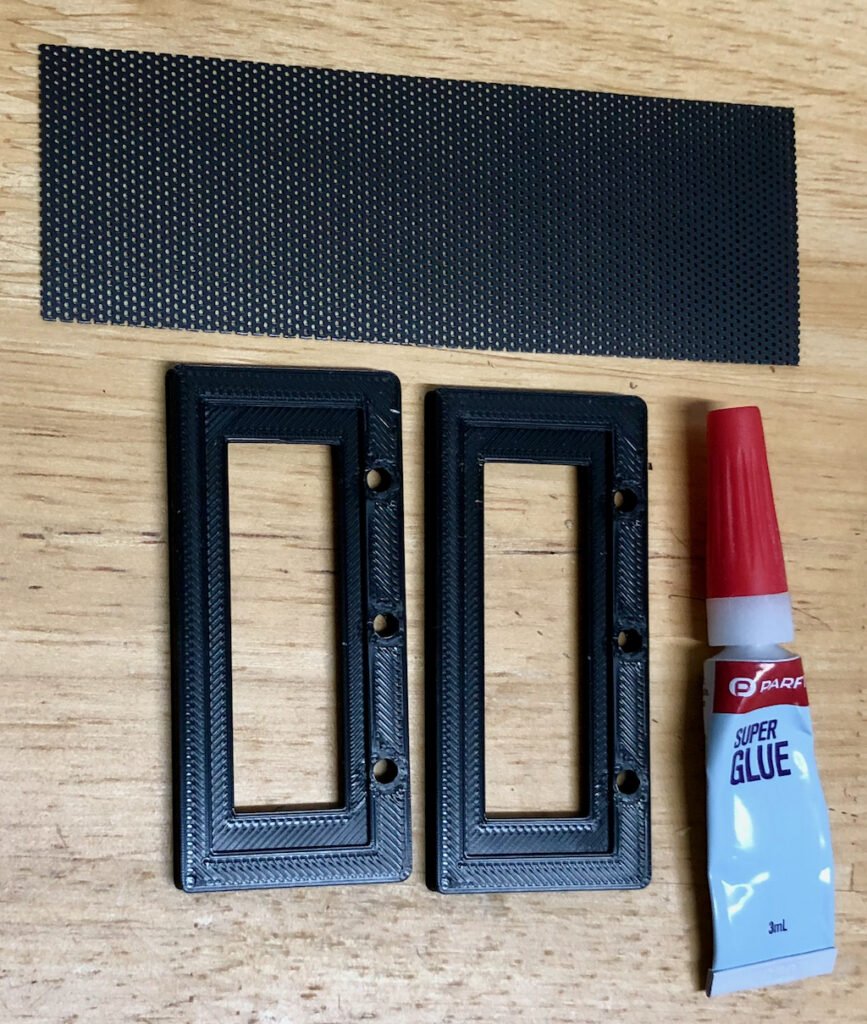
These protectors can then be mounted with wood screws on the left and right to the bottom of the case.
Here is a view of the bottom of the case fully assembled with just the micro USB cable sticking out.
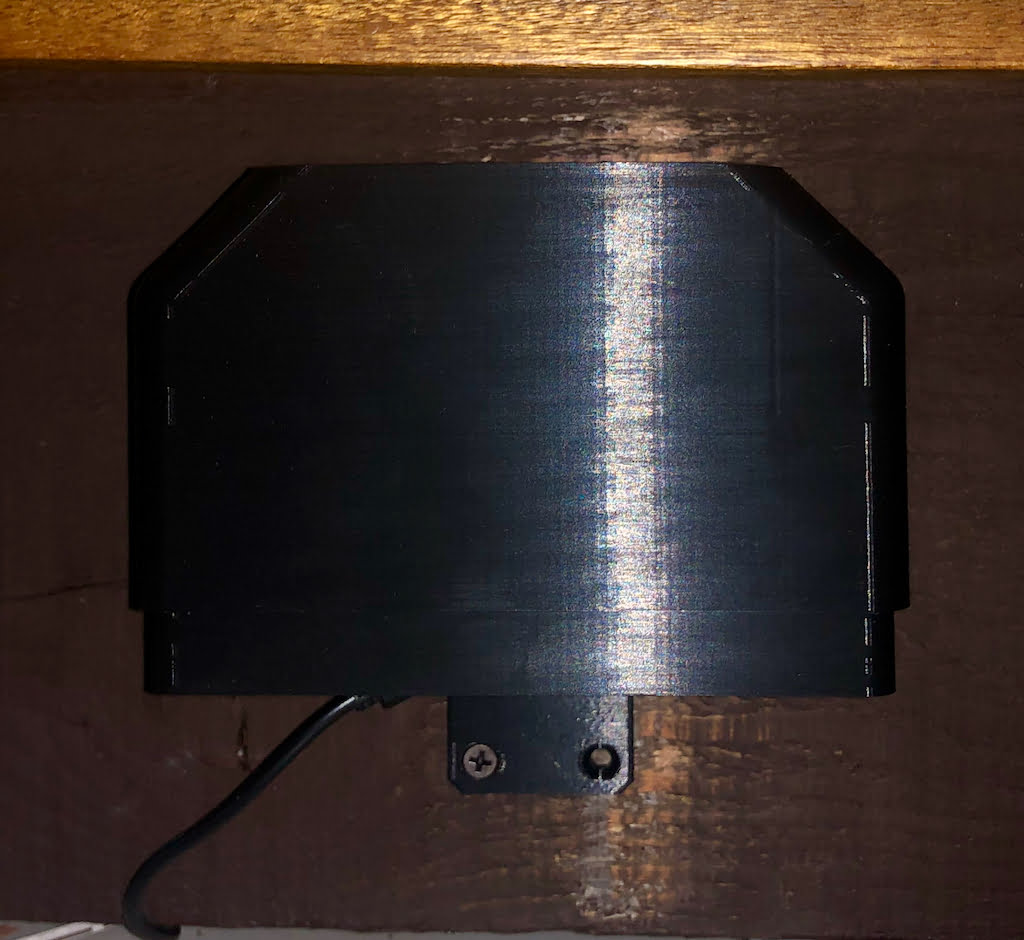
And this is how the device looks like when mounted onto a beam in our living room. The colour definitely helps to make it blend in.
ESPHome
In the following ESPHome configuration I left out the usual standard things and focus on the sensors that this post is all about. The recommendation for the SGP30 sensor is to read its values every second, but I introduced a 5 second moving average filter to reduce the load onto Home Assistant a little bit. It’s quite the opposite for the SDS011 sensor which I set to update every 5 minutes to prolong its lifetime.
esphome:
  name: ESP Air Quality
  platform: ESP32
  board: nodemcu-32s

[...]

i2c:

uart:
  rx_pin: GPIO16
  tx_pin: GPIO17
  baud_rate: 9600

sensor:
  - platform: bme280
    address: 0x76
    temperature:
      name: "Temperature"
    humidity:
      name: "Humidity"
    pressure:
      name: "Pressure"
      filters:
        - lambda: return x / 0.9765179;
  - platform: sgp30
    eco2:
      name: "eCO2"
      accuracy_decimals: 1
      filters:
        - sliding_window_moving_average:
            window_size: 5
            send_every: 5
    tvoc:
      name: "TVOC"
      accuracy_decimals: 1
      filters:
        - sliding_window_moving_average:
            window_size: 5
            send_every: 5
    store_baseline: yes
    address: 0x58
    update_interval: 1s
  - platform: sds011
    pm_2_5:
      name: "PM 2.5 Concentration"
    pm_10_0:
      name: "PM 10 Concentration"
    update_interval: 5min
Home Assistant
Looking at discrete values does not really make too much sense when it comes to air quality and instead you want to aggregate data and measure the average concentration over a period of time to get a better understanding of your air quality.
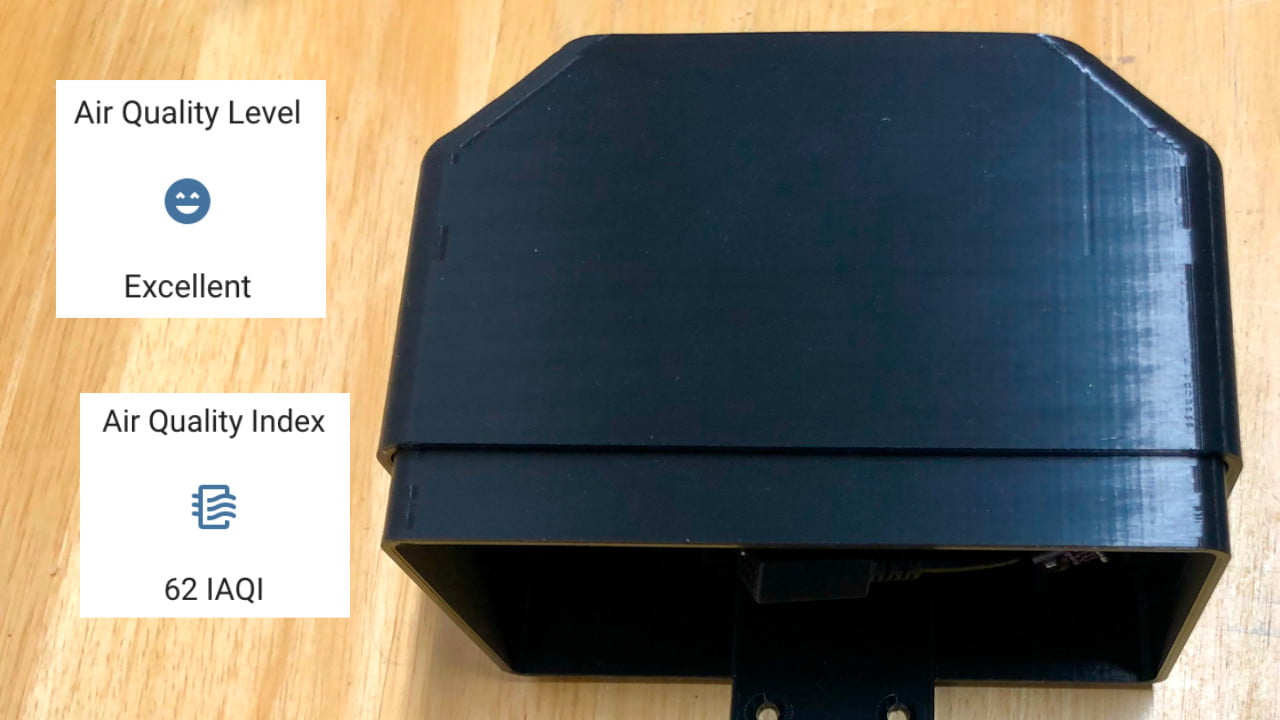
IAQ UK
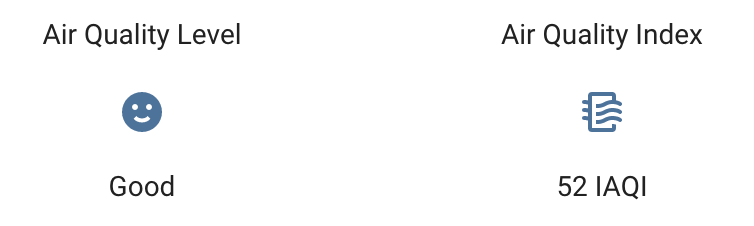
You may want to take a look at this custom component, available via HACS, which calculates an air quality index based on recommendations of the IAQ UK organisation. This takes all sensor values of this device into account to calculate a numerical indicator of your air quality.
iaquk:
  living_room:
    name: "Living Room"
    sources:
      temperature: sensor.esp_air_quality_temperature
      humidity: sensor.esp_air_quality_humidity
      co2: sensor.esp_air_quality_eco2
      tvoc: sensor.esp_air_quality_tvoc
      pm:
        - sensor.esp_air_quality_pm_2_5_concentration
        - sensor.esp_air_quality_pm_10_concentration
This configuration produces two sensors calculating a numerical and a human-readable value.
Refining sensor values
Because I live in Australia I wanted to see if there is something comparable here. The NSW government has published some information about indoor air pollutant but remains fairly vague with just very high level recommendations. More promising is the Handbook Indoor Air Quality from the Australian Building Codes Board which recommends the following:
- CO2 maximum contaminant limit: 850 ppm averaged over 8 hours
- TVOC maximum contaminant limit: 500 μg/m³ averaged over one hour
- PM 2.5 maximum contaminant limit: 25 μg/m³ average over 24 hours
- PM 10 maximum contaminant limit: 50 μg/m³ average over 24 hours
The following statistics sensors are averaging the discrete values from the ESPHome device based on the above recommendations.
sensor:
  - platform: statistics
    entity_id: sensor.esp_air_quality_pm_2_5_concentration
    name: Indoor PM 2.5 Concentration Stats
    # 24 hours
    max_age:
      hours: 24
    # Should not get more than 1 value per minute.
    sampling_size: 1440
  - platform: statistics
    entity_id: sensor.esp_air_quality_pm_10_concentration
    name: Indoor PM 10 Concentration Stats
    # 24 hours
    max_age:
      hours: 24
    # Should not get more than 1 value per minute.
    sampling_size: 1440
  - platform: statistics
    entity_id: sensor.esp_air_quality_eco2
    name: Indoor eCO2 Concentration Stats
    # 8 hours
    max_age:
      hours: 8
    # Should not get more than 1 value per second.
    sampling_size: 28800
  - platform: statistics
    entity_id: sensor.esp_air_quality_tvoc
    name: Indoor TVOC Concentration Stats
    # 1 hour
    max_age:
      hours: 1
    # Should not get more than 1 value per second.
    sampling_size: 3600
The SGP30 sensor measures TVOC in ppb, so we will have to convert this when comparing the average value against the above recommended maximum. For now I am not taking varying temperature and air pressure into account, and stick to the following formula:
Concentration (μg/m³) = 0.0409 x concentration (ppb) x molecular weight, using an average weight of 100 g/mole.
The first of the following template sensors is converting the TVOC value into µg/m³. The two particulate matter sensors are following an air quality index defined by the NSW Department of Planning, Industry and Environment (except for the averaging period). Finally, the four binary sensors are indicating whether the abovementioned maximum contaminent limits have been exceeded.
template:
- sensor:
- name: Indoor TVOC Concentration
state: "{{ (states('sensor.indoor_tvoc_concentration_stats') | float(default=0.0) * 4.09) | round(2, default=0.0) }}"
unit_of_measurement: 'µg/m³'
device_class: volatile_organic_compounds
availability: "{{ not is_state('sensor.indoor_tvoc_concentration_stats', 'unavailable') }}"
icon: mdi:molecule
# Air Quality Index = (PM10 mean over 1 day / 50) * 100
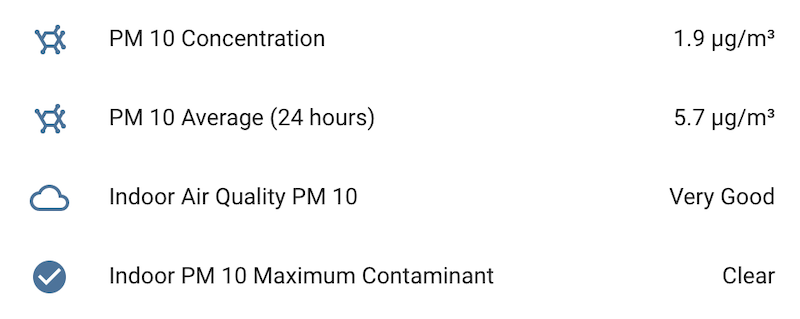
- name: Indoor Air Quality PM 10
state: >-
{%if ((states('sensor.indoor_pm_10_concentration_stats') | float(default=0.0)) * 2.0) <= 33 %}Very Good
{% elif ((states('sensor.indoor_pm_10_concentration_stats') | float(default=0.0)) * 2.0) <= 66 | float(default=0.0) > 33 %}Good
{% elif ((states('sensor.indoor_pm_10_concentration_stats') | float(default=0.0)) * 2.0) <= 99 | float(default=0.0) > 66 %}Fair
{% elif ((states('sensor.indoor_pm_10_concentration_stats') | float(default=0.0)) * 2.0) <= 149 | float(default=0.0) > 99 %}Poor
{% elif ((states('sensor.indoor_pm_10_concentration_stats') | float(default=0.0)) * 2.0) <= 200 | float(default=0.0) > 149 %}Very Poor
{% elif ((states('sensor.indoor_pm_10_concentration_stats') | float(default=0.0)) * 2.0) > 200 %}Hazardous
{%- endif %}
icon: mdi:cloud-outline
availability: "{{ not is_state('sensor.indoor_pm_10_concentration_stats', 'unavailable') }}"
# Air Quality Index = (PM2.5 mean over 1 day / 25) * 100
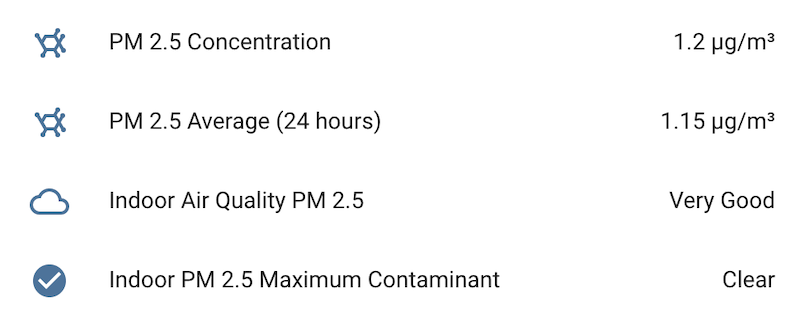
- name: Indoor Air Quality PM 2.5
state: >-
{%if ((states('sensor.indoor_pm_2_5_concentration_stats') | float(default=0.0)) * 4.0) <= 33 %}Very Good
{% elif ((states('sensor.indoor_pm_2_5_concentration_stats') | float(default=0.0)) * 4.0) <= 66 | float(default=0.0) > 33 %}Good
{% elif ((states('sensor.indoor_pm_2_5_concentration_stats') | float(default=0.0)) * 4.0) <= 99 | float(default=0.0) > 66 %}Fair
{% elif ((states('sensor.indoor_pm_2_5_concentration_stats') | float(default=0.0)) * 4.0) <= 149 | float(default=0.0) > 99 %}Poor
{% elif ((states('sensor.indoor_pm_2_5_concentration_stats') | float(default=0.0)) * 4.0) <= 200 | float(default=0.0) > 149 %}Very Poor
{% elif ((states('sensor.indoor_pm_2_5_concentration_stats') | float(default=0.0)) * 4.0) > 200 %}Hazardous
{%- endif %}
icon: mdi:cloud-outline
availability: "{{ not is_state('sensor.indoor_pm_2_5_concentration_stats', 'unavailable') }}"
- binary_sensor:
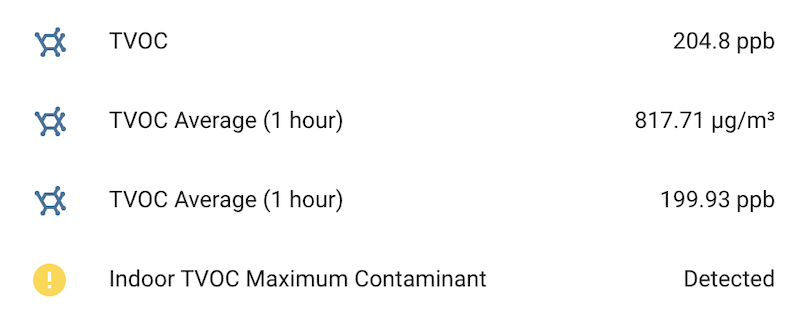
- name: Indoor TVOC Maximum Contaminant
state: "{{ (states('sensor.indoor_tvoc_concentration') | float(default=0.0)) >= 500.0 }}"
device_class: gas
availability: "{{ not is_state('sensor.indoor_tvoc_concentration', 'unavailable') }}"
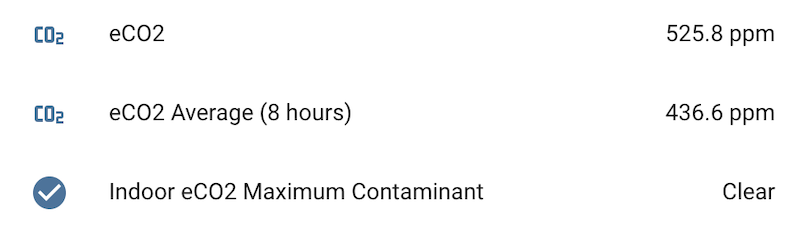
- name: Indoor eCO2 Maximum Contaminant
state: "{{ (states('sensor.indoor_eco2_concentration_stats') | float(default=0.0)) >= 850.0 }}"
device_class: gas
availability: "{{ not is_state('sensor.indoor_eco2_concentration_stats', 'unavailable') }}"
- name: Indoor PM 2.5 Maximum Contaminant
state: "{{ (states('sensor.indoor_pm_2_5_concentration_stats') | float(default=0.0)) >= 25.0 }}"
device_class: smoke
availability: "{{ not is_state('sensor.indoor_pm_2_5_concentration_stats', 'unavailable') }}"
- name: Indoor PM 10 Maximum Contaminant
state: "{{ (states('sensor.indoor_pm_10_concentration_stats') | float(default=0.0)) >= 50.0 }}"
device_class: smoke
availability: "{{ not is_state('sensor.indoor_pm_10_concentration_stats', 'unavailable') }}"The above configuration results in the following entities being created in Home Assistant.
CO2
TVOC
PM 2.5
PM 10
I think this is probably good enough for now, and we will see how useful this information is over time.
A couple of weeks ago we had a tradie here who was cutting tiles and generating a lot of dust. As expected the TVOC and particulate matter sensor readings went through the roof, so this new device is definitely working.
Outlook
The next step is now to have a think about how to visualise the air quality for the family. I will most likely start with displaying the IAQ UK integration’s information on the tablets in the house, and then look at notifications later.
Compatibility
At the time of writing this post, I used:
- Home Assistant 2021.10.6 with Python 3.9.7 in Docker
- ESPHome 2021.10.3
- Creality CR-6 SE with eSUN PLA+ filament
Leave a Reply