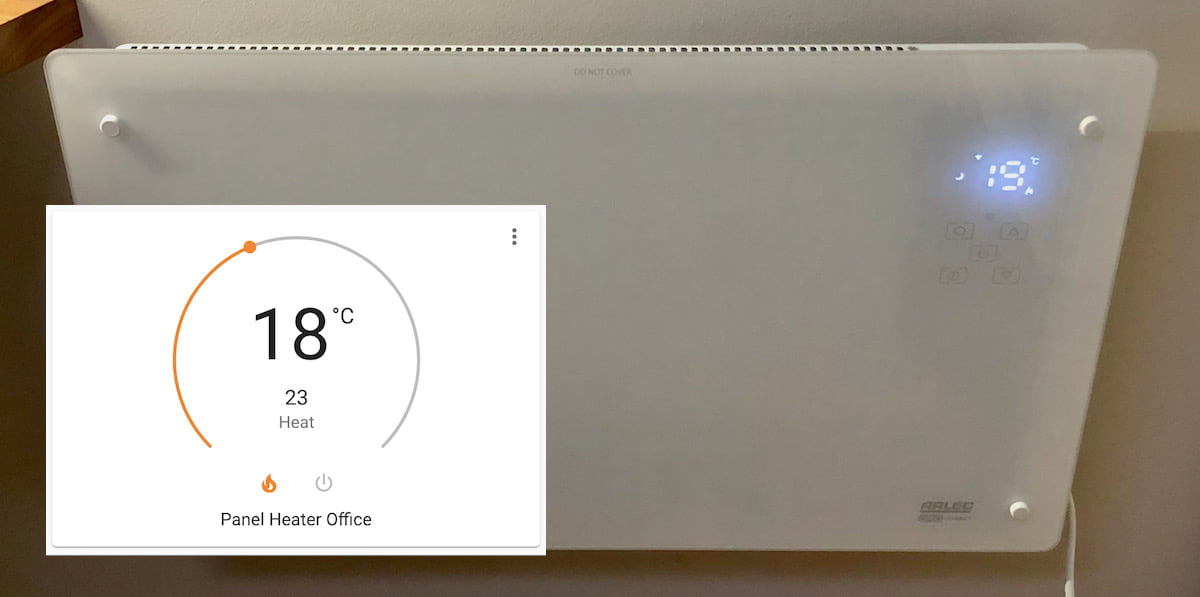
Two winters ago in 2019 I bought an Arlec smart panel heater from Bunnings and finally took some time to integrate it into Home Assistant. Luckily it was old enough so that tuya convert worked without any problems. Initially I thought the heater would have the usual ESP-MCU combination built in, so I tried going with a ESPHome firmware and the Tuya MCU component. Unfortunately any attempts to talk to the MCU were unsuccessful, and I decided to switch to Tasmota which turned out to be the right choice for this device.
Getting Tasmota configured
With a bit of luck I found out that my Arlec panel heater (Model PEH223HA) was working in a very similar way to the Devola Designer Glass Panel Heater in the Tasmota template library.
It turned out that the ESP is using a serial protocol to communicate with the MCU and the messages were fairly easy to decode based on the great groundwork from the Tasmota template.
| Byte | Description |
| 1-2 | Direction – “F1F1” from ESP, “F2F2” from MCU |
| 3-4 | Padding “0210” |
| 5 | Power – “02”=OFF, “01”=ON |
| 6 | Childlock – “02”=OFF, “01”=ON |
| 7-10 | Padding “00 00 00 00” |
| 11 | Mode – “00”=off, “02”=low, “03”=high, “04”=anti frost |
| 12 | Setpoint temperature, in hex format |
| 13-14 | Timer – “0100” = off, “0001” = on, “0002” = 1 hr, “0003” = 2 hrs (etc.) |
| 15 | Ambient temperature, in hex format |
| 16-19 | Padding “01 00 00 01” |
| 20 | Additive checksum of bytes 3-19 |
| 21 | Terminator – always “7E” |
Template
The following template is a slightly modified version of the original Tasmota template for the Devola panel heater. It defines the serial connection to talk to the MCU.
{"NAME":"Arlec Heater","GPIO":[0,0,0,0,0,1,0,0,0,1824,0,1792,0,0],"FLAG":0,"BASE":18}Please note that I removed the virtual power button from the original template because I am not intending to turn the heater on or off from Tasmota’s web UI, but instead only use Home Assistant via MQTT.
MQTT
I have defined the following topic for this device (used in the configuration further down below) and as usual I swapped topic and prefix:
Topic: esp_panel_heater_office
Full Topic: %topic%/%prefix%/
Rules
The following rule initialises the WiFi icon based on whether or not the ESP is connected to WiFi and MQTT. It also enables a function to get the device into access point mode when the power button is held down for 3 seconds (although I have not tested this, just copied from the template).
RULE1
  ON System#Init do sserialsend5
    F1F10210000000000000000000000000000400167E ENDON
  ON WiFi#Connected do sserialsend5
    F1F10210000000000000000000000000000300157E ENDON
  ON Mqtt#Connected do sserialsend5
    F1F10210000000000000000000000000000100137E ENDON
  ON Mqtt#Disconnected do sserialsend5
    F1F10210000000000000000000000000000300157E ENDON
  ON Wifi#Disconnected do sserialsend5
    F1F10210000000000000000000000000000100137E ENDON
  ON sserialreceived#Data=F2F20600067E DO Wificonfig 2 ENDON
The following rule initiates a hear-beat that polls the MCU every 60 seconds and the response then contains the current state of the heater’s configuration.
RULE2
  ON Mqtt#Connected DO RuleTimer1 60 ENDON
  ON Rules#Timer=1 DO backlog sserialsend5 F1F10100017E; ruletimer1 60 ENDON
Home Assistant Integration
In Home Assistant I am using the standard Tasmota integration and this takes care of all the basic functionality including lots of status entities. This integration does not support the climate platform, and I guess even if it did it would be quite a challenge to easily support this panel heater with its custom serial protocol.
The next option I looked at was the MQTT HVAC integration. This is based on the idea that you define all sorts of MQTT topics and templates to take care of the various aspects of the device. I developed a configuration that supports the following:
- Turn the heater on and off. This is based on the
modewhich supports fixed states and in this case onlyoffandheatare implemented. - Set the heating mode (
off,low,high,anti-frost). I decided to implement this using the integration’s fan mode. - Change the setpoint temperature. There is a bit of a delay (~2 seconds) between changing the temperature in Home Assistant until it is shown on the panel heater’s display itself, but other than that it has been very reliable.
- Show ambient temperature.
The template code may seem a little overwhelming at first, but the complexity is due to the use of the device’s hexadecimal serial protocol.
climate:
  - platform: mqtt
    name: "Panel Heater Office"
    unique_id: "esp_panel_heater_office_climate"
    availability_topic: "esp_panel_heater_office/tele/LWT"
    payload_available: "Online"
    payload_not_available: "Offline"
    modes:
      - "off"
      - "heat"
    mode_state_topic: "esp_panel_heater_office/tele/RESULT"
    mode_state_template: "{% if value_json['SSerialReceived'][20:22] == '00' %}off{% else %}heat{% endif %}"
    power_command_topic: "esp_panel_heater_office/cmnd/sserialsend5"
    payload_on: "F1F10210010000000000000000000001000001157E"
    payload_off: "F1F10210020000000000000000000001000001167E"
    fan_modes:
      - "off"
      - "low"
      - "high"
      - "anti-frost"
    fan_mode_state_topic: "esp_panel_heater_office/tele/RESULT"
    fan_mode_state_template: "{% if value_json['SSerialReceived'][20:22] == '02' %}low{% elif value_json['SSerialReceived'][20:22] == '03' %}high{% elif value_json['SSerialReceived'][20:22] == '04' %}anti-frost{% else %}off{% endif %}"
    fan_mode_command_topic: "esp_panel_heater_office/cmnd/sserialsend5"
    fan_mode_command_template: >
      {% set modes = { 'off': '02', 'heat': '01' } %}
      {% set fan_modes = { 'off': '00', 'low': '02', 'high': '03', 'anti-frost': '04'} %}
      {{ ["F1F10210", modes[states('climate.panel_heater_office')], "0000000000", fan_modes[value], ('%#x' % (state_attr('climate.panel_heater_office', 'temperature') | int))[2:], "01000001000001", (('%#x' % ( 21 + (modes[states('climate.panel_heater_office')] | int) + (fan_modes[value] | int) + (state_attr('climate.panel_heater_office', 'temperature') | int)))[2:] | upper), "7E"] | join }}
    temperature_state_topic: "esp_panel_heater_office/tele/RESULT"
    temperature_state_template: "{{ value_json['SSerialReceived'][22:24] | int(base=16) }}"
    temperature_unit: "C"
    min_temp: 18.0
    max_temp: 30.0
    temperature_command_topic: "esp_panel_heater_office/cmnd/sserialsend5"
    temperature_command_template: >
      {% set modes = { 'off': '02', 'heat': '01' } %}
      {% set fan_modes = { 'low': '02', 'high': '03', 'anti-frost': '04'} %}
      {{ ["F1F10210", modes[states('climate.panel_heater_office')], "0000000000", fan_modes[state_attr('climate.panel_heater_office', 'fan_mode')], ('%#x' % (value | int))[2:], "01000001000001", (('%#x' % ( 21 + (modes[states('climate.panel_heater_office')] | int) + (fan_modes[state_attr('climate.panel_heater_office', 'fan_mode')] | int) + (value | int)))[2:] | upper), "7E"] | join }}
    precision: 1.0
    current_temperature_topic: "esp_panel_heater_office/tele/RESULT"
    current_temperature_template: "{{ value_json['SSerialReceived'][28:30] | int(base=16) }}"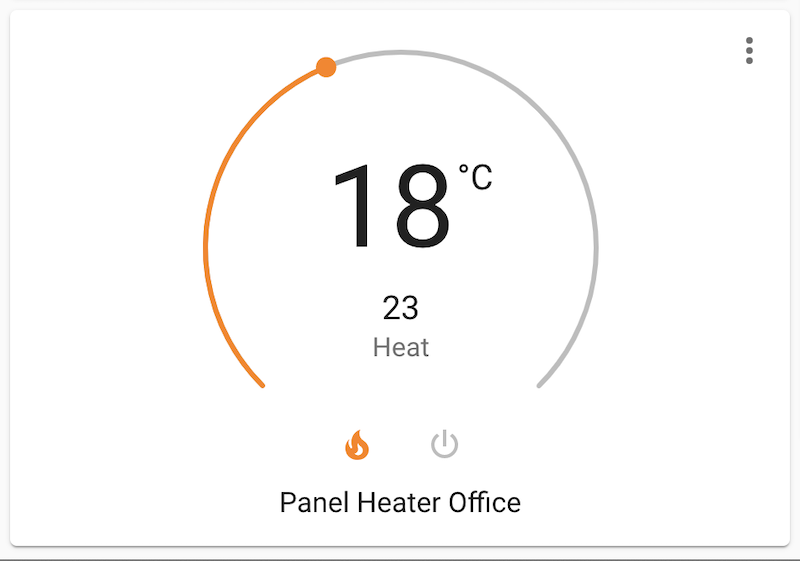

Usage scenarios
My home office where one of the two panel heaters is mounted has high ceilings, and I implemented two automations that turn a ceiling fan on and off. The fan supports a “winter” mode which reverses its direction and pushes air down. So, while the heater is running the fan distributes the hot air in the room.
- After the heater has been turned from
offtoheatfor 5 minutes, the ceiling fan is turned on. - And after the heater has been turned from
heattoofffor minutes, the ceiling fan is turned off.
I did not bother integrating the heater’s built-in timer because Home Assistant’s control and automation capabilities are much more flexible than a simple hourly timer.
The ability to enable and disable the childlock from Home Assistant may be an interesting future improvement. I manually tested that remote controlling the heater from Home Assistant works fine while the childlock is enabled.
Latest model available in 2021
It’s now May 2021 and I just bought another one of these Arlec panel heaters (Model PEH225HA), and as we have seen with many other recent devices, tuya convert does not work anymore. The good news is that the heater can be opened up fairly easily and the ESP board can be removed for serial flashing.
Before you continue, please be aware that you are opening up a 240V appliance, so make sure to take all the precautiouns, unplug the power cable, let the device cool down, and only perform this surgery if you are confident that you can put everthing back together.
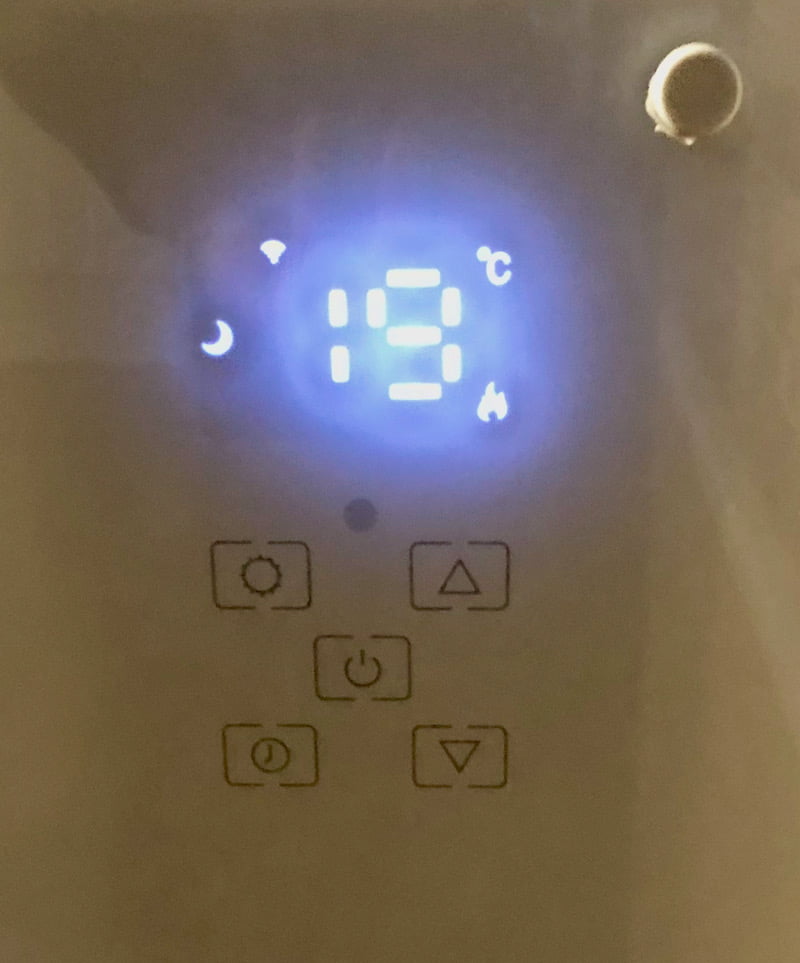
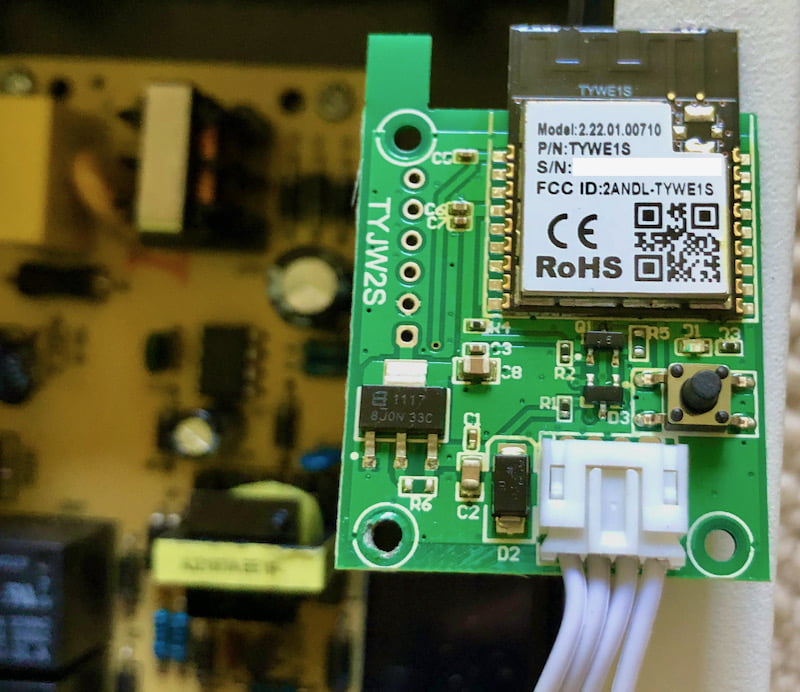
To get to the ESP board you put the heater on its back and remove 4 screws – 2 on the left and 2 on the right – which fix the glass panel to the metal frame. The glass panel can be removed carefully (my older heater had its buttons and the display glue to the glass, but I slowly pulled the glass panel away without ripping buttons or display off of the board). The board that holds the buttons and display needs to be removed – again 4 screws to be removed, and underneath appears a TYJW2S-5V ESP board with a TYWE1S on board. Luckily it can easily be removed by unplugging the white connector, and the board also has all the required GPIO exposed and neatly labelled.
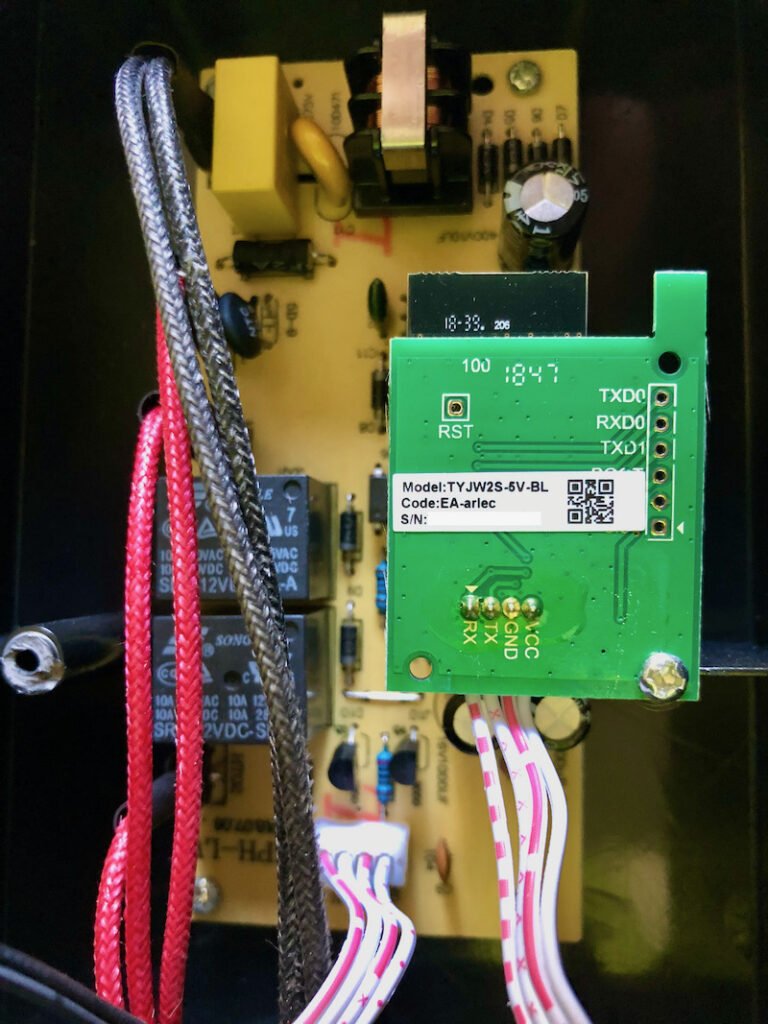
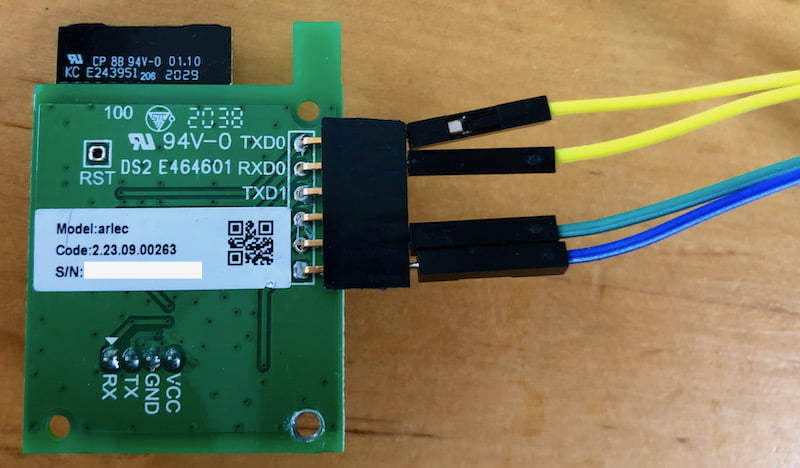
After soldering on some pin headers, all you need is a serial-to-USB adapter, connect GND to GND, 3.3V to VCC (make sure your adapter is set to 3.3V!), TXD0 to RX and RXD0 to TX. Also, you need to connect the BOOT pin to GND when you connect to the adapter to your USB port to get the ESP into flash mode. I used esptool to install the Tasmota binary, but there are other options if you prefer a nice user interface.
As mentioned on the Tasmota template page you can not boot the ESP right after flashing, but need to put it back into the panel heater.
After reassembling the device its ESP should boot up Tasmota and you can follow the usual configuration steps of adopting it into your IoT network, configure MQTT, etc., before following the abovementioned steps to make your new panel heater fully available in Home Assistant.
Compatibility
At the time of writing this post, I used:
- Home Assistant 2021.5.5 with Python 3.8.9 in Docker
- Tasmota 9.4.0
Update 13 November 2023
I wrote this post more than 2 years ago, and of course the software world has moved on. Luckily my smart panel heater is still working fine, but I had to make a few tweaks after continuously updating Home Assistant. Read more about the steps I took and my trouble-shooting steps.
Leave a Reply